Assigning a Checklist
This section covers:
- Creating a Checklist Assignment
- Assign a Checklist
- Delegate a Checklist
- Schedule a Checklist
- Cancelling Assignment
Creating a Checklist Assignment
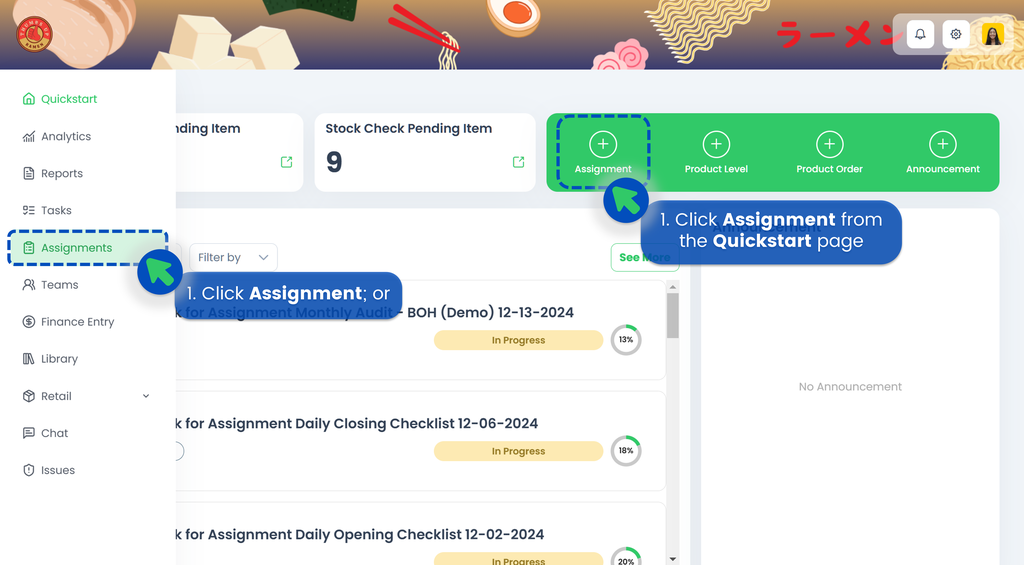
- From the Portal, click Assignments. You can find Assignments from the left panel menu or from the Quickstart page.
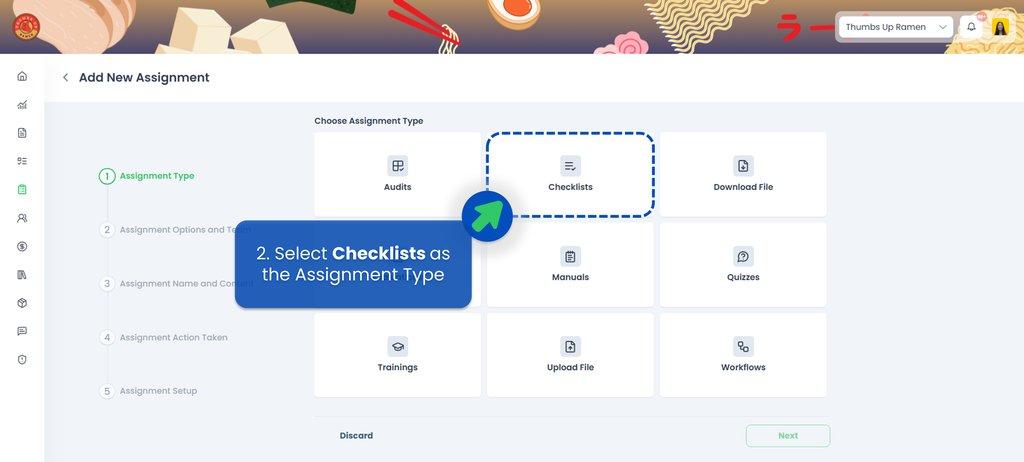
- Select "Checklist" as the Assignment Type then click Next.
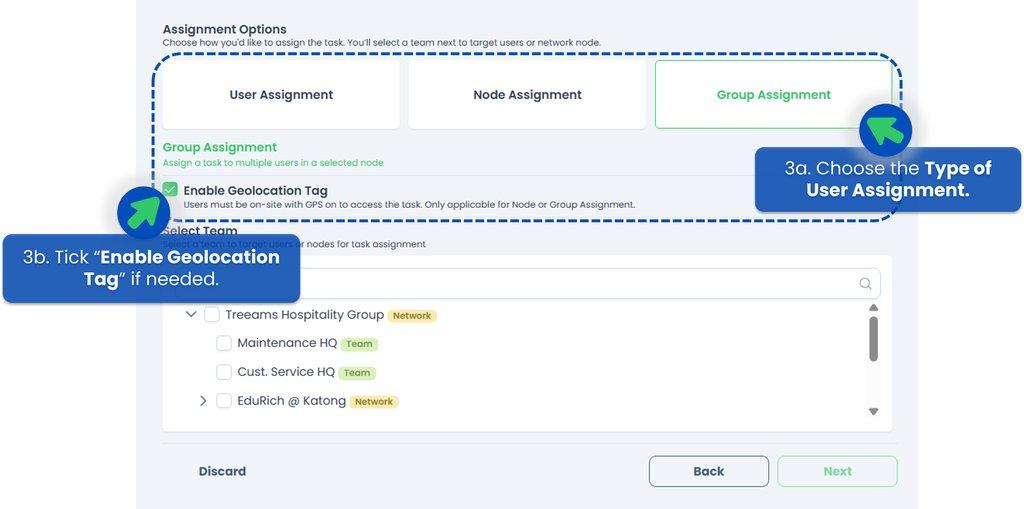
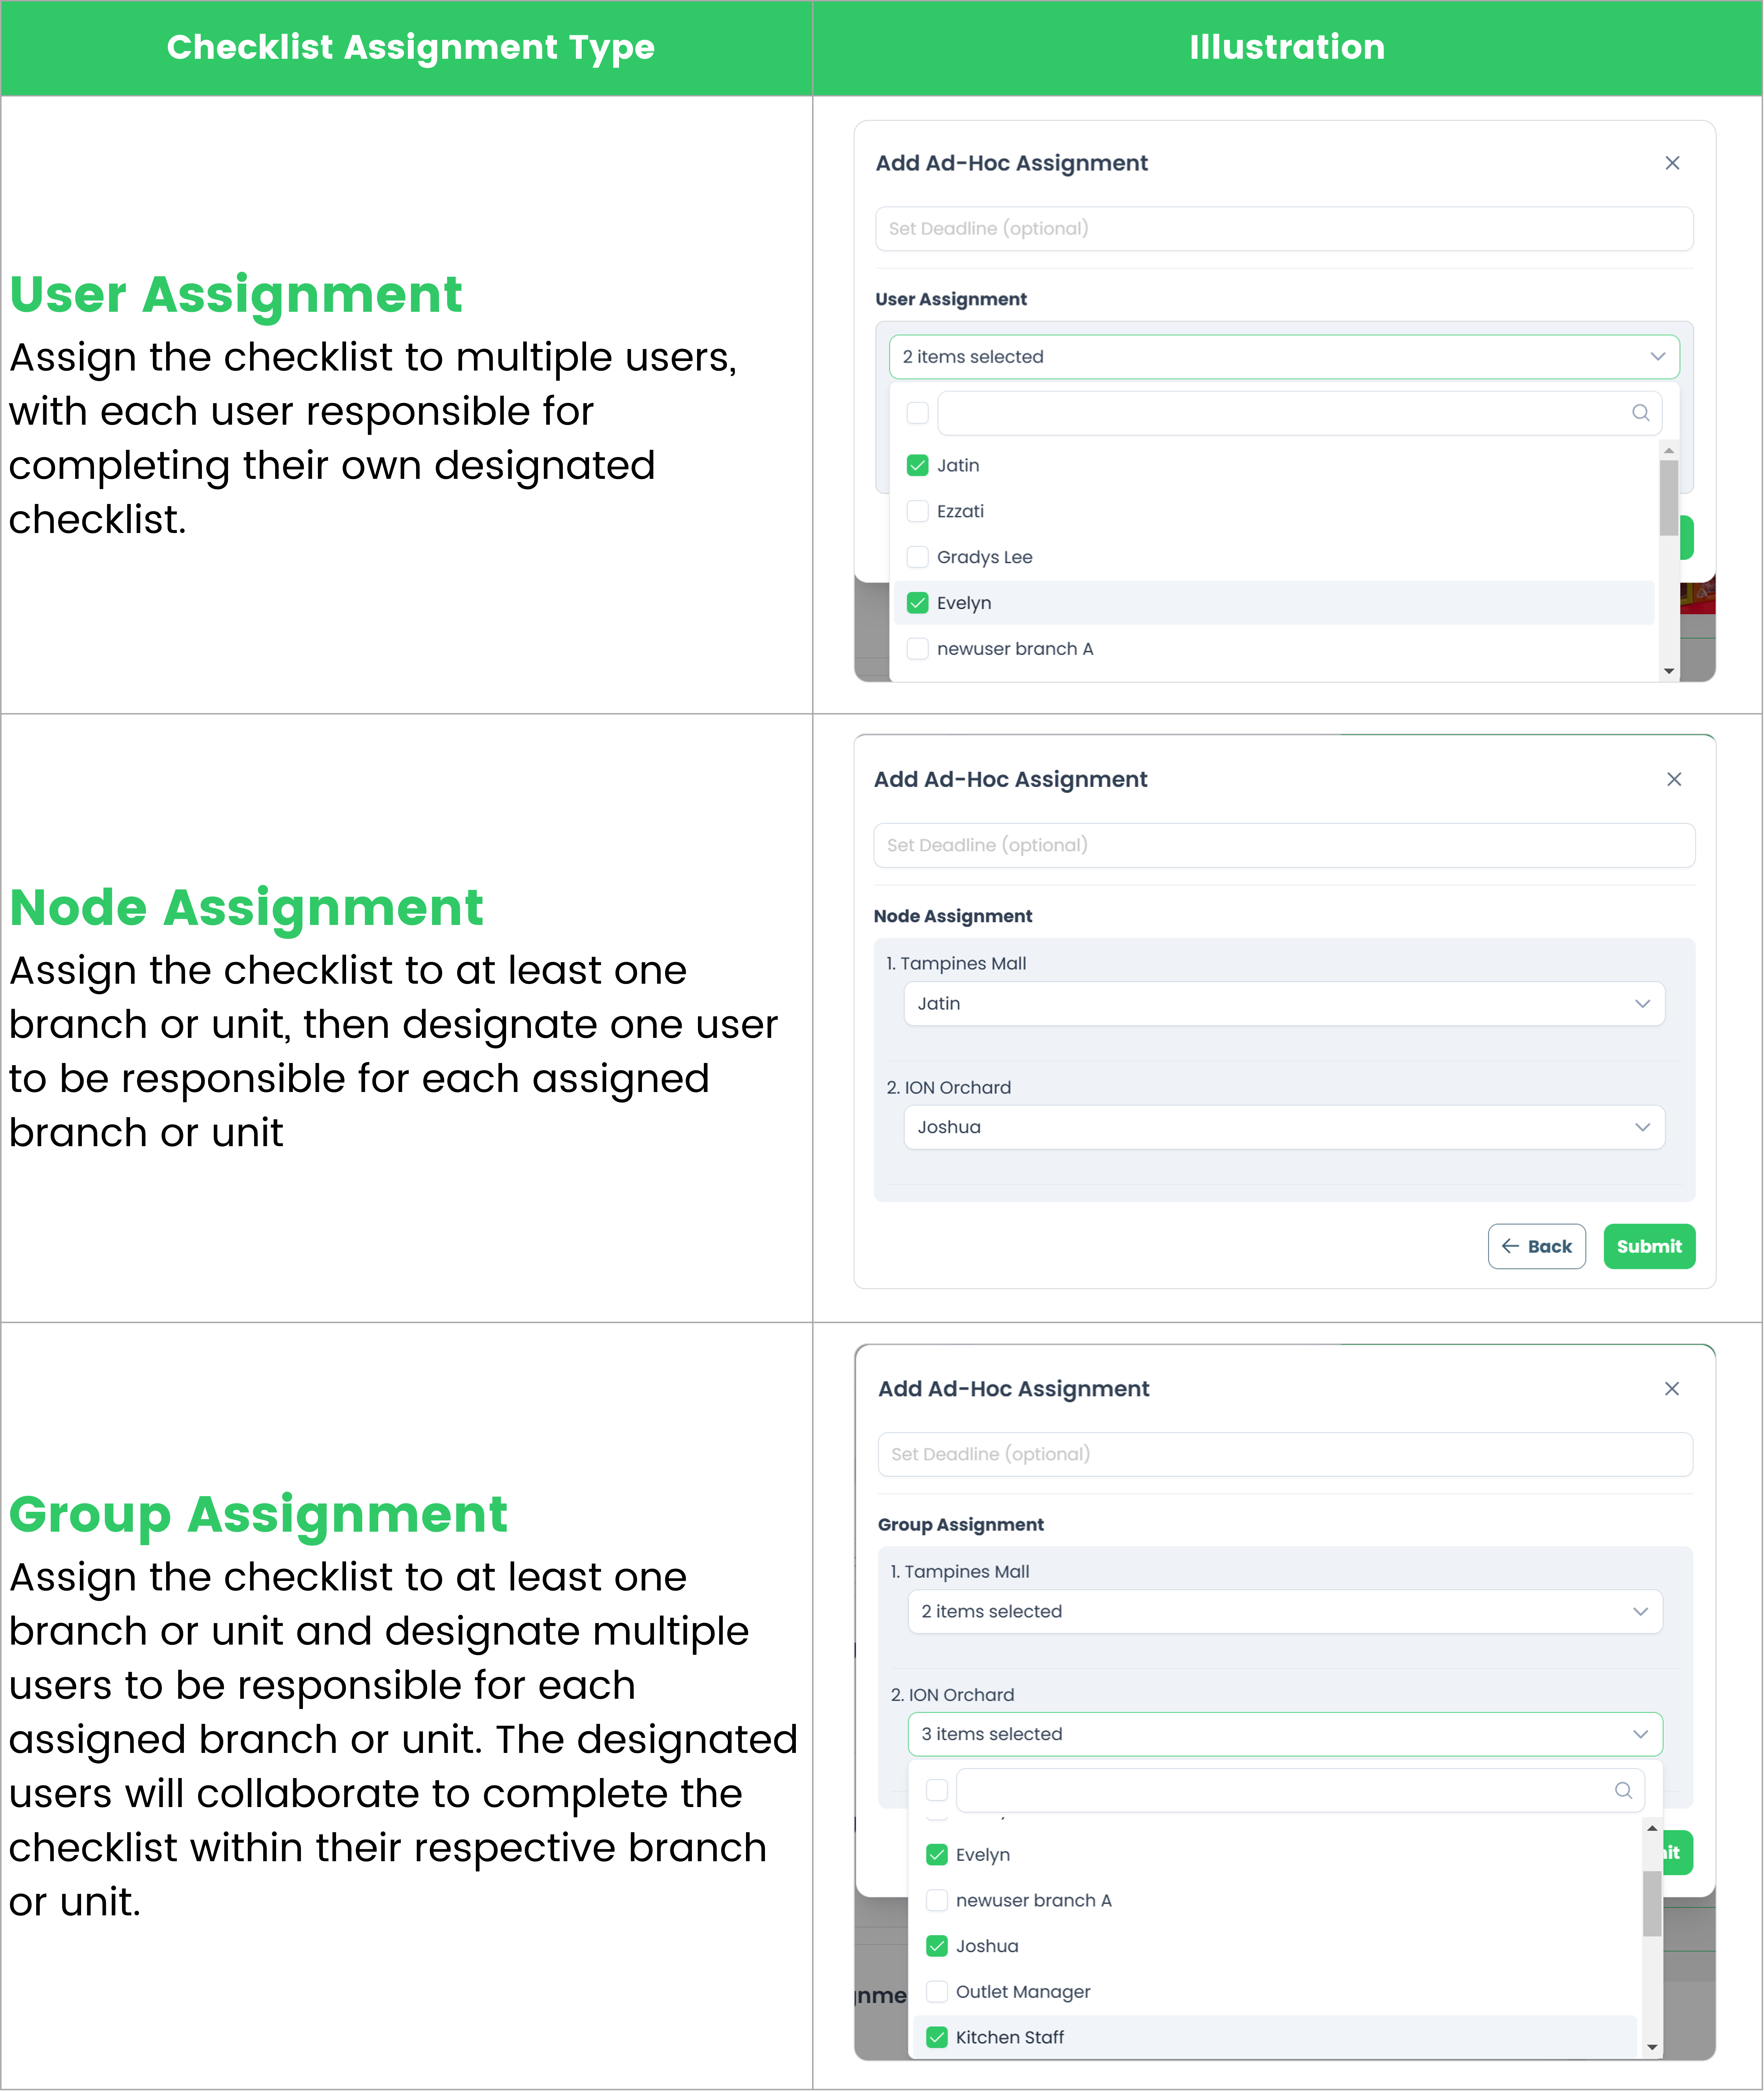
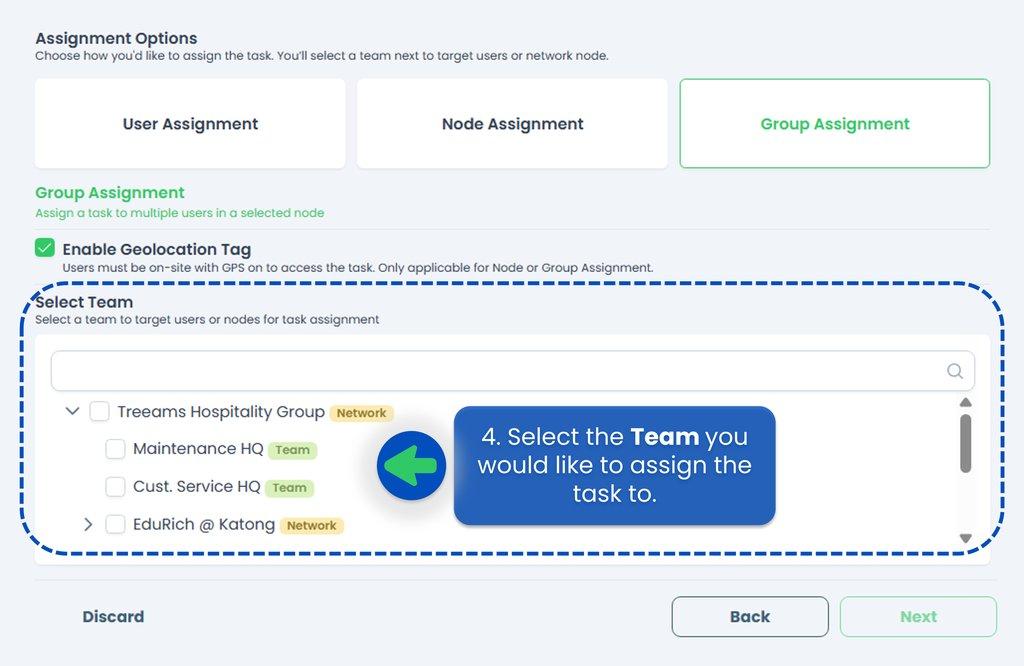
- Select the Assignment Type. Choose how you would like to assign the task — whether to a user, a network node, or a team. You can also enable the Geolocation Tag to ensure users must be on-site with GPS enabled to access the task.
 Refer to below table for more details on the different assignment types available on TreeAMS or go to Assignment Options and Team.
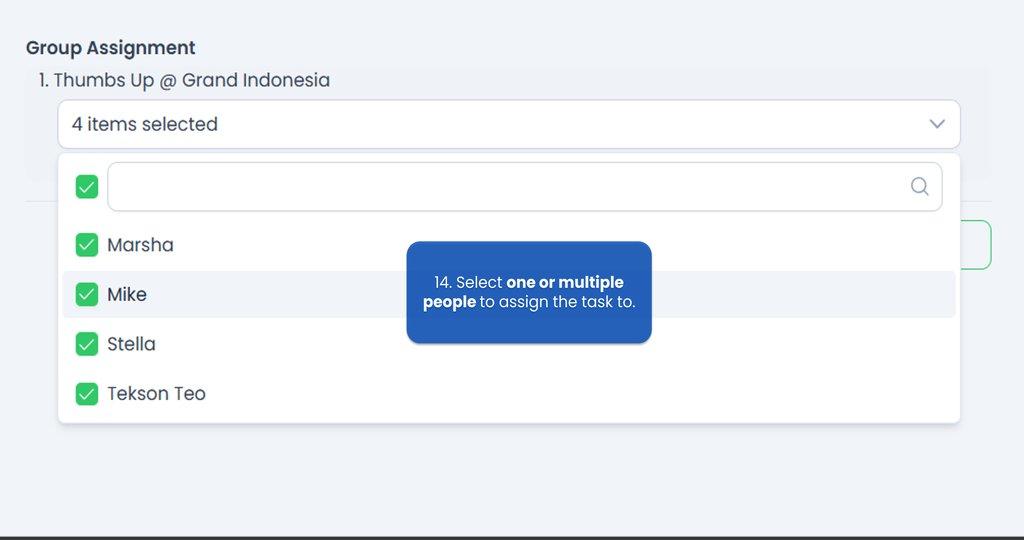
- Select Team or Network to target users or nodes for Checklist assignment. You can select more than one team, depending on your need, then click Next. If you haven’t set up any team on your network node yet, refer to How to Creating a Team for guidance. Even if you choose User Assignment, selecting a Team or Network is still required. This ensures that only users within the chosen Team or Network are displayed, preventing irrelevant users from being shown and simplifying the selection process.
- Select the Checklist you'd like to assign. If you haven't created any Checklists, refer to How to Creat a Checklist to start creating or adding your Checklist!
- This is optional but you can rename your Checklist!
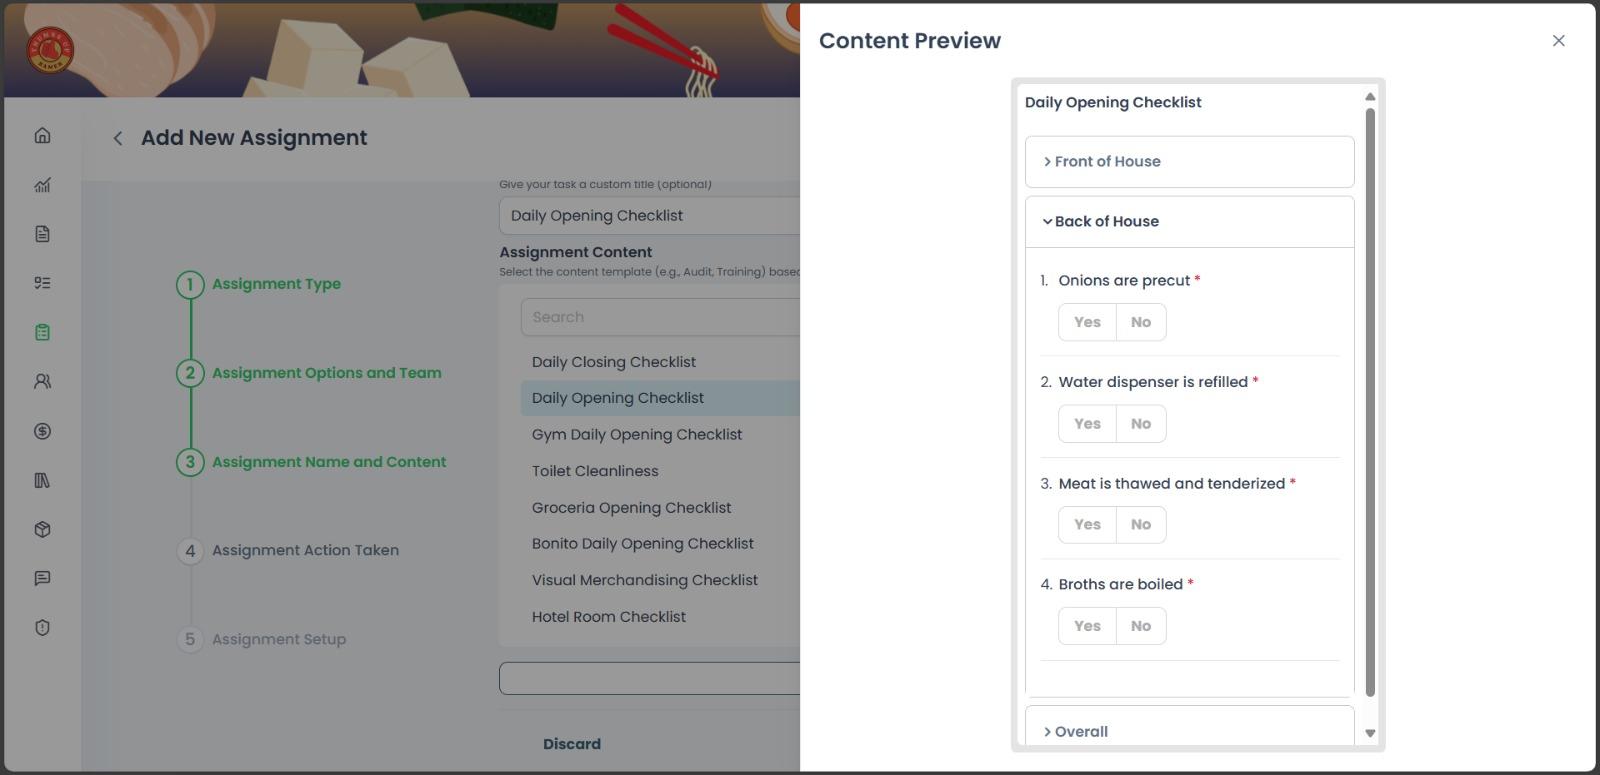
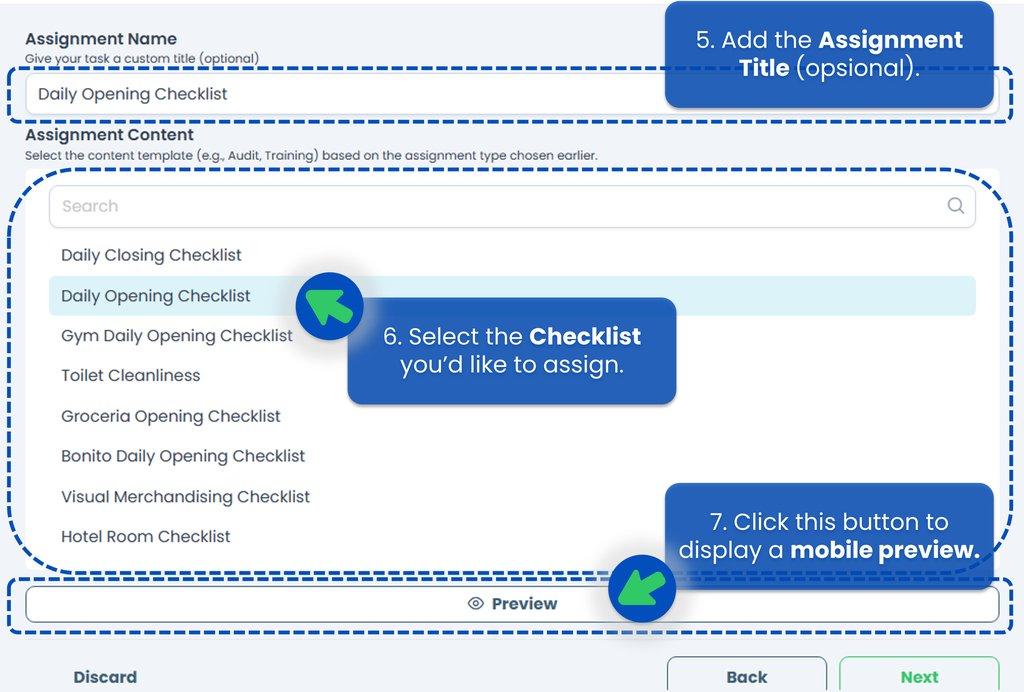 You can also click "Preview" first to ensure you've selected the correct Checklist, then click Next.
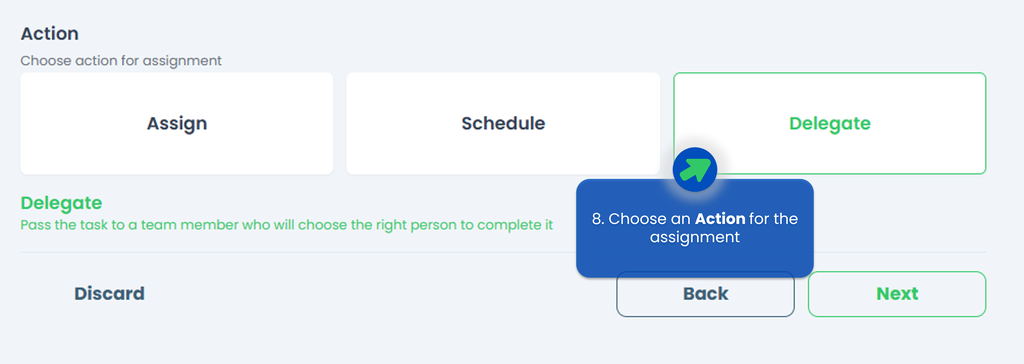
- Select an action for how and when the Checklist will be assigned to the selected team or users, then click Next. If your Checklist contains repetitive tasks, you can also select "Schedule" so the tasks repeat daily, for example, and you don’t have to create them manually each day.
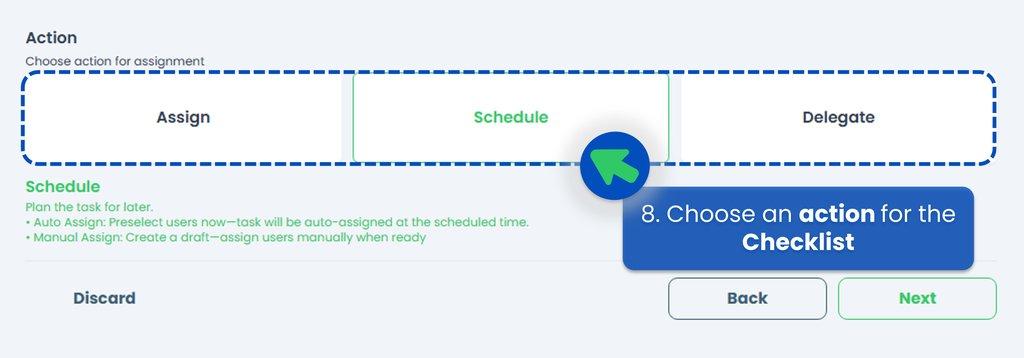 Here is the explaination of each action, you can also refer to Assignment Action Taken for detail.
- Assign Task 👉 means designating at least one person to complete the Checklist. If you're unsure who the appropriate person in charge is but know someone who can identify them, consider using the Delegate feature.
- Delegate Assignment 👉 instead of directly assigning the Checklist, you have the option to delegate it. This feature is especially helpful when you're unsure who is responsible for conducting the Checklist but know someone who can appoint the appropriate person.
- Schedule Assignment 👉 create regular and scheduled Checklists.
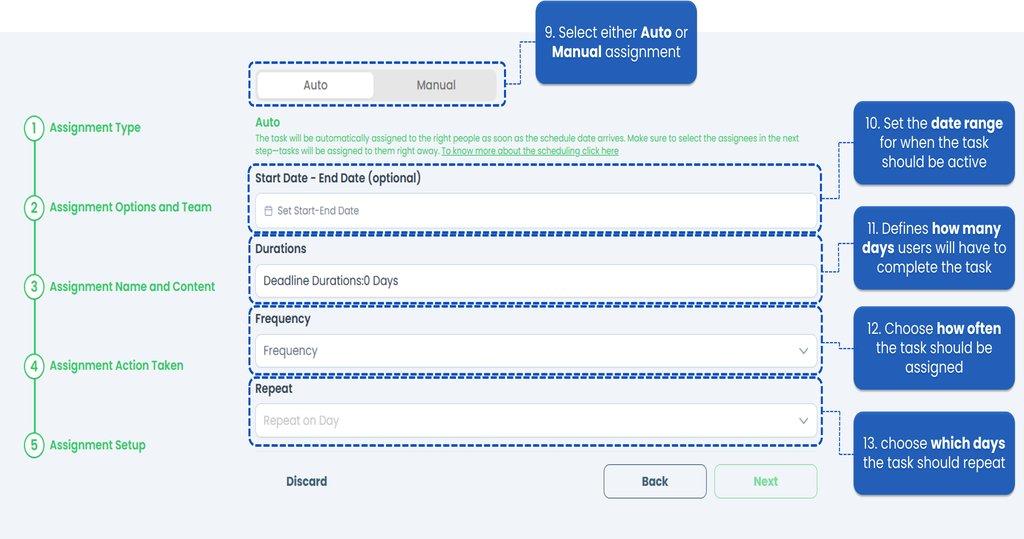
- Fill up the Assignment Setup section. Set when will the Checklist be ready to work on, how many days should the Checklist be completed in, and how often the Checklist should be assigned, then click Next. Refer to Assignment Setup for option detail.
- Select the right people based on team or location chosen in previous step.
 This is the final step of create the Checklist assignment, so make sure everything is good before clicking Submit.
Assign a Checklist
- In step 8, if you choose the Assign action, you will be able to send the Checklist at that time directly to the person responsible for it.

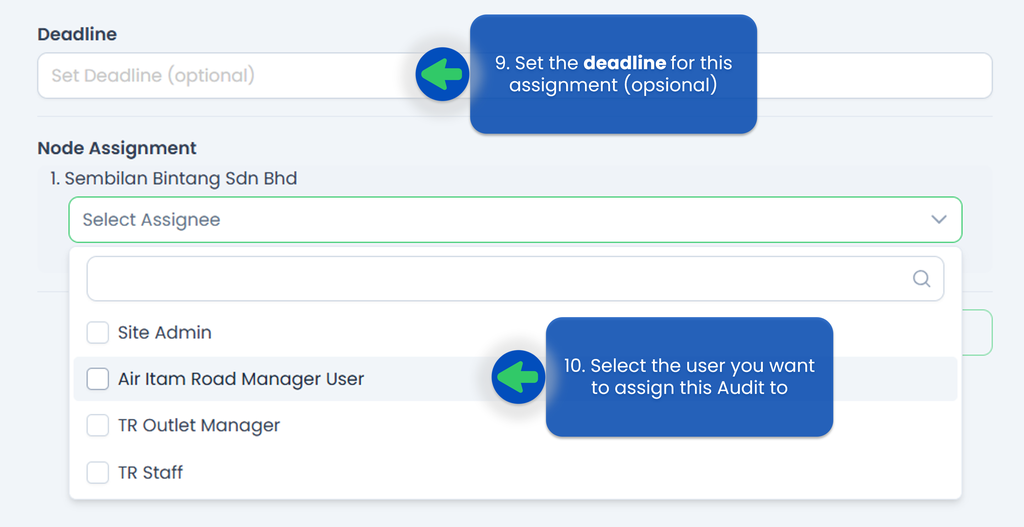
- Set a deadline for this assignment if you’d like!
- Select the person responsible to the Checklist.
- Click Submit.
- Your Checklist has been successfully assigned!
Delegate a Checklist
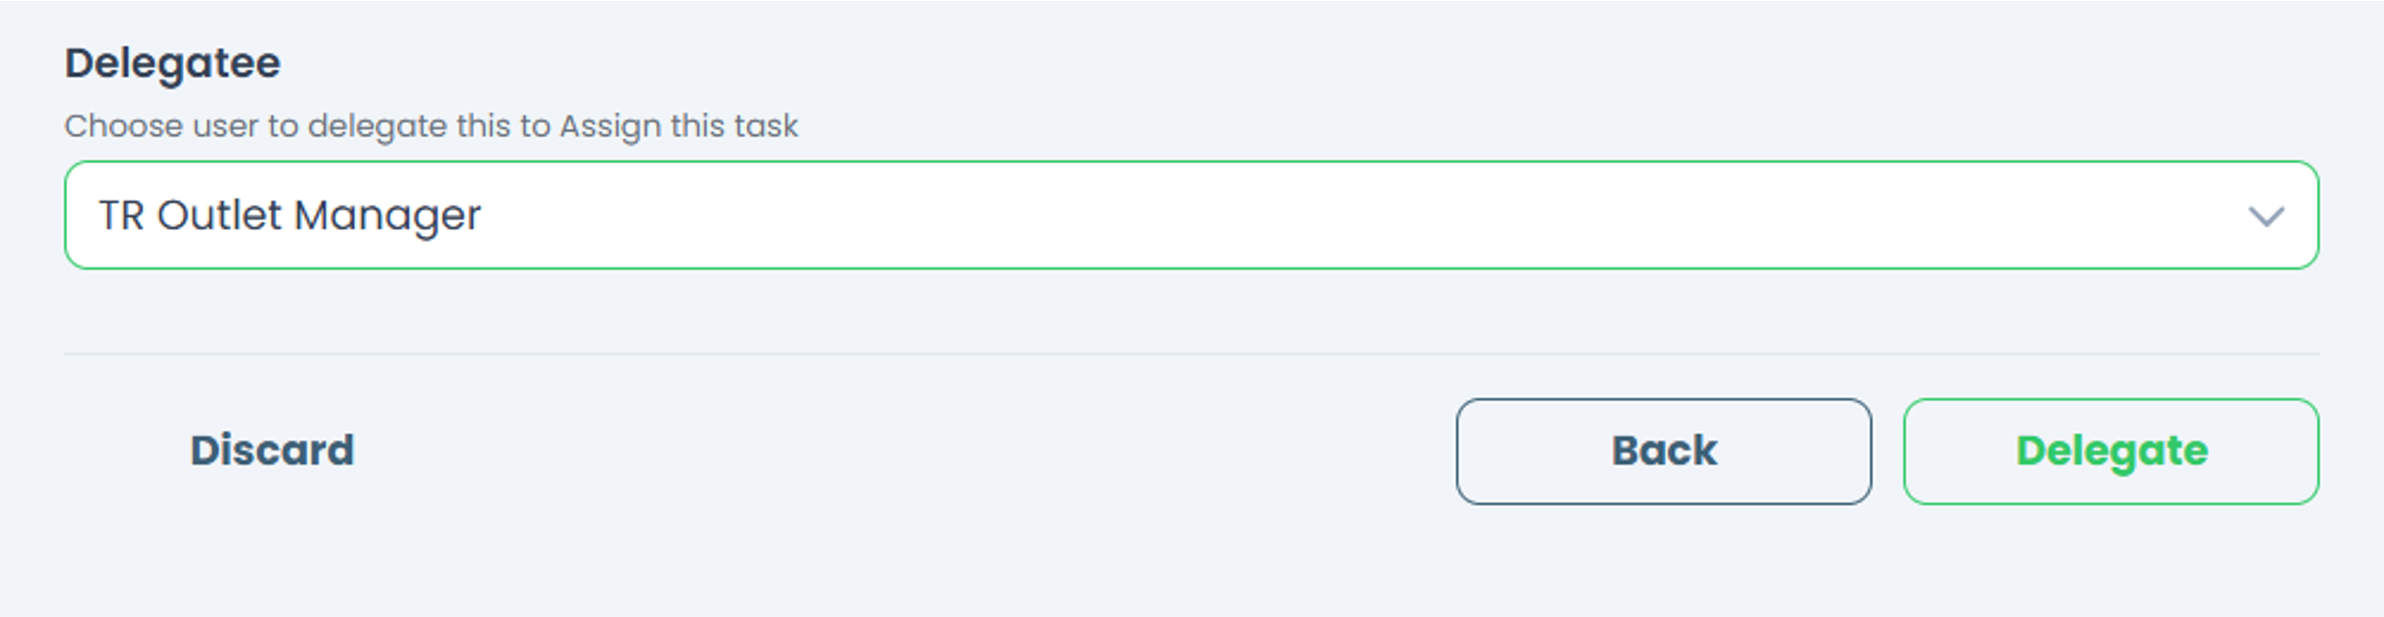
- In step 8, if you choose the Delegate action, you will be able to send the Checklist at that time to someone who can appoint the appropriate person (in case you don't know the person responsible for it, you can delegate to the Manager of the store for example).
 Note: you can only delegate one user for each assignment.
 - IMPORTANT‼️ The Delegatee's role must be either a Site Admin or a Site User (with TreeAMS Assignment Manager as the sub-role). Remember! A Portal User cannot assign tasks as they are only allowed to do tasks.
- Click Delegate.
- Your Checklist has been successfully delegated!
Schedule a Checklist

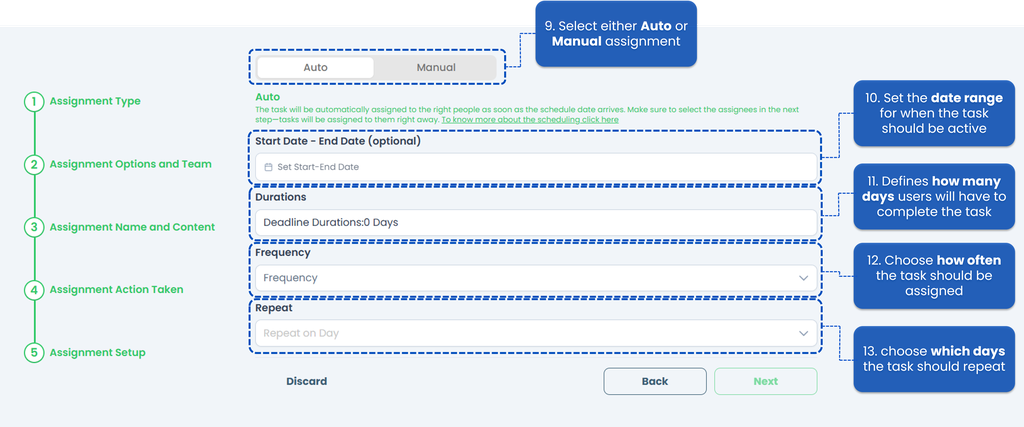
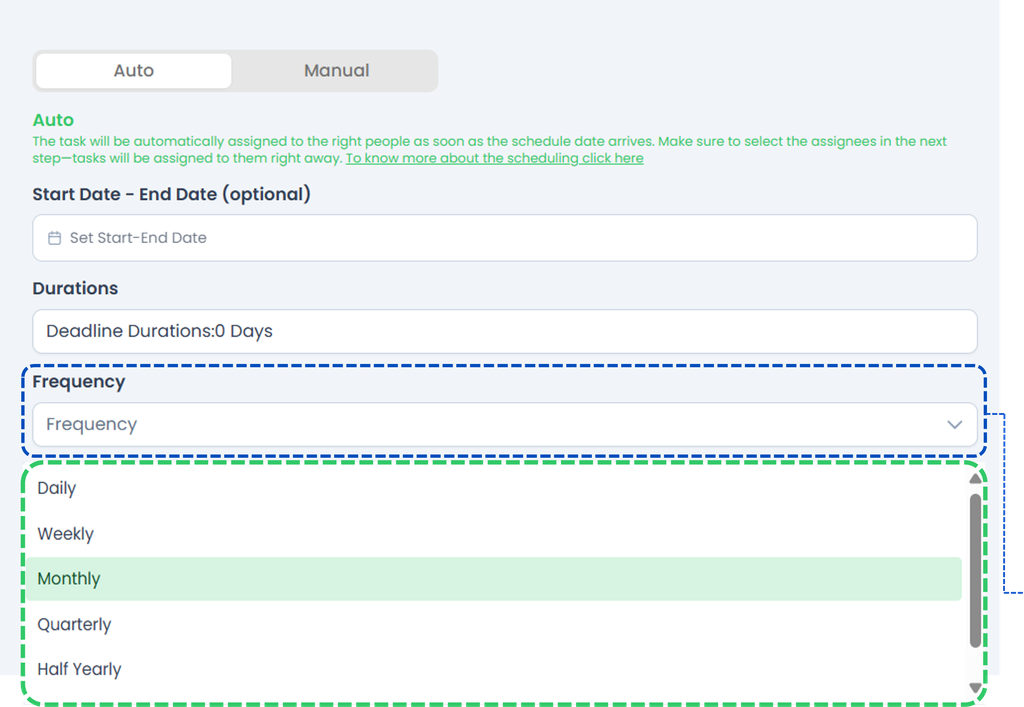
- Select either Auto or Manual Assignment
- Auto Assignment 👉 the Checklist will be automatically assigned to the same assignee.
- Manual Assignment 👉 you have to select the assignee every time the Checklist is created.
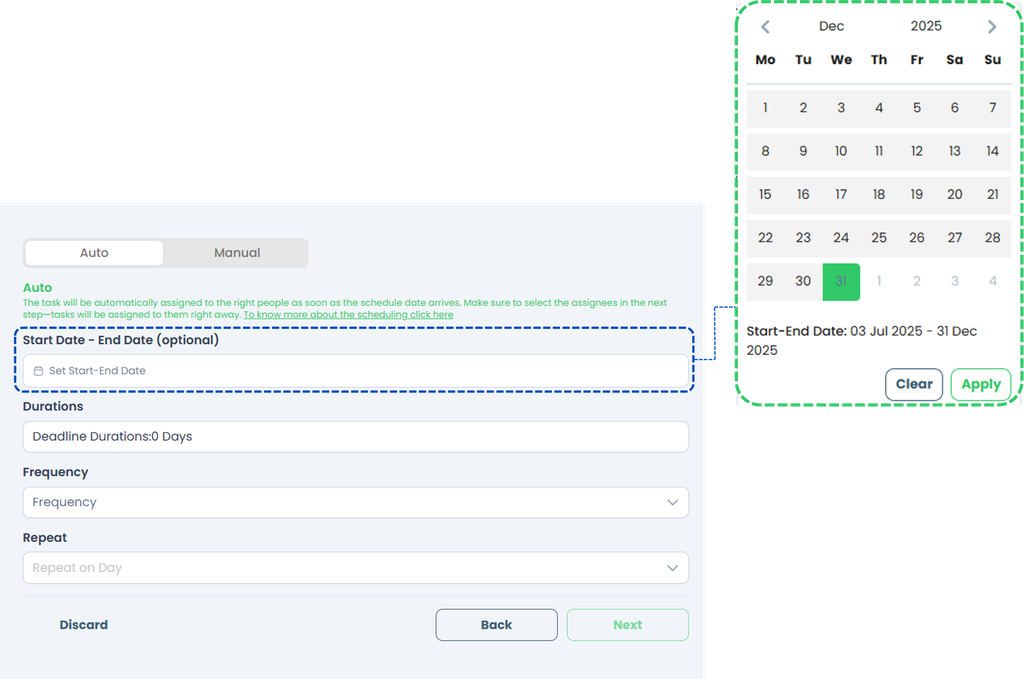
- Select the Start Date and the End Date of the assignment so the system knows when the task should become active and when it should expire, but this is optional.
- Select the Durations to define how many day(s) user will have to complete the task.
- Select the Frequency to define how often the task should be assigned.
- Daily👉 If the task repeats every day. Suitable for: daily opening/closing checklists, hygiene checks, etc.
- Weekly👉 The task repeats every week on specific days (e.g., every Monday and Friday) which can be set in the Repeat. Suitable for: weekly team meetings, equipment inspections, stock reviews.
- Monthly👉 The task repeats every month on a specific date (e.g., the 1st or 15th) which can be set in the Repeat. Suitable for: monthly reporting, supply ordering, performance reviews.
- Quarterly👉 The task will repeat every 3 months on a specific date (e.g., the 1st or 15th) which can be set in the Repeat. Suitable for: quarterly audits, system upgrades, strategic reviews.
- Half Yearly👉 The task will repeat every 6 months on a specific date (e.g., the 1st or 15th) which can be set in the Repeat. Suitable for: major deep cleaning, biannual maintenance, training refreshers.
- Yearly👉 The task will repeat once a year on a specific date (e.g., the 1st or 15th) which can be set in the Repeat. Suitable for: annual inventory, policy reviews, license renewals.
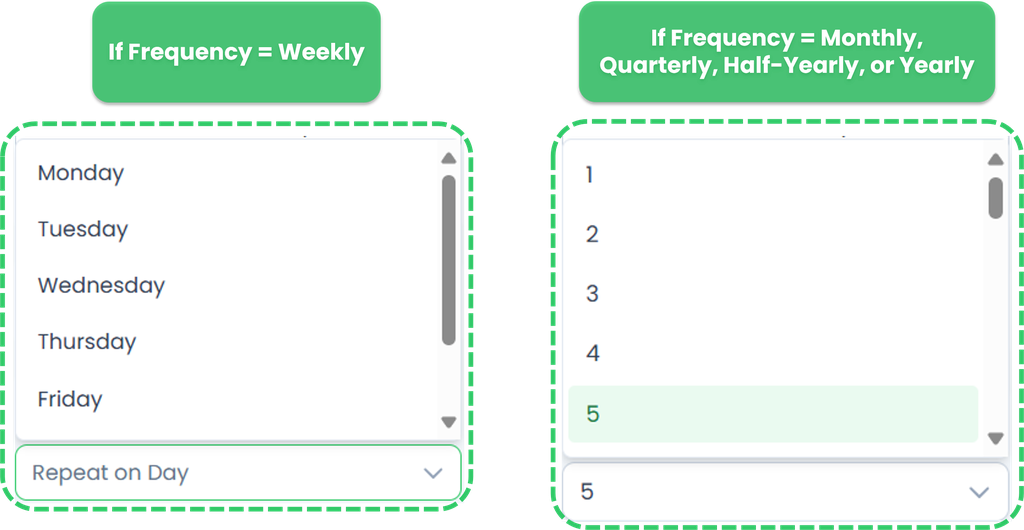
- Select the Repeat to define when exactly the recurring task should take place, depending on the frequency you've chosen.
- If Frequency = Daily No repeat day selection is needed, as the task will already run every day.
- If Frequency = Weekly You will be asked to choose one or more days of the week. Options: Monday, Tuesday, Wednesday, Thursday, Friday, Saturday, Sunday. ✅ Example: Select Monday & Thursday if you want the task to run every Monday and Thursday.
- If Frequency = Monthly, Quarterly, Half-Yearly, or Yearly You will be asked to choose the specific day(s) of the month. Options: 1 to 31. ✅ Example: Select 15 if you want the task to repeat on the 15th of the month or quarter. Note: If a month doesn’t have 31 days (e.g., February), tasks set on unavailable dates may be skipped or pushed earlier depending on the system logic.
- Click Next.
- Select Assignee.
- Click Submit.
- IMPORTANT‼️ The first task will appear only at the end of the day.
Cancelling Assignment
In TreeAMS, you can cancel Checklists in various statuses, including draft, assigned, delegated, and in progress. Follow the steps below for detailed instructions:
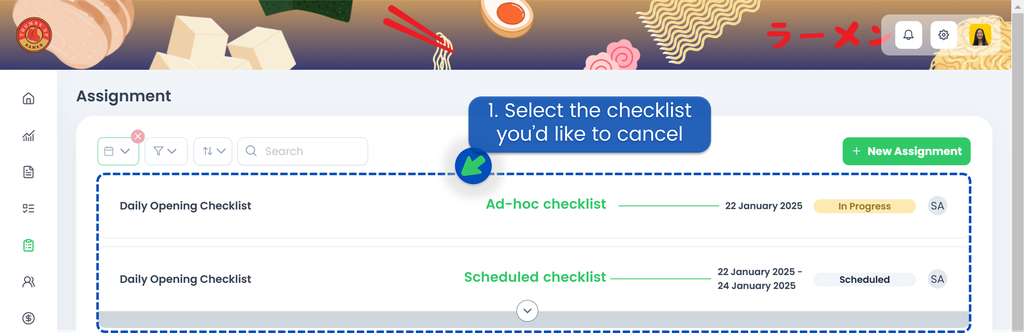
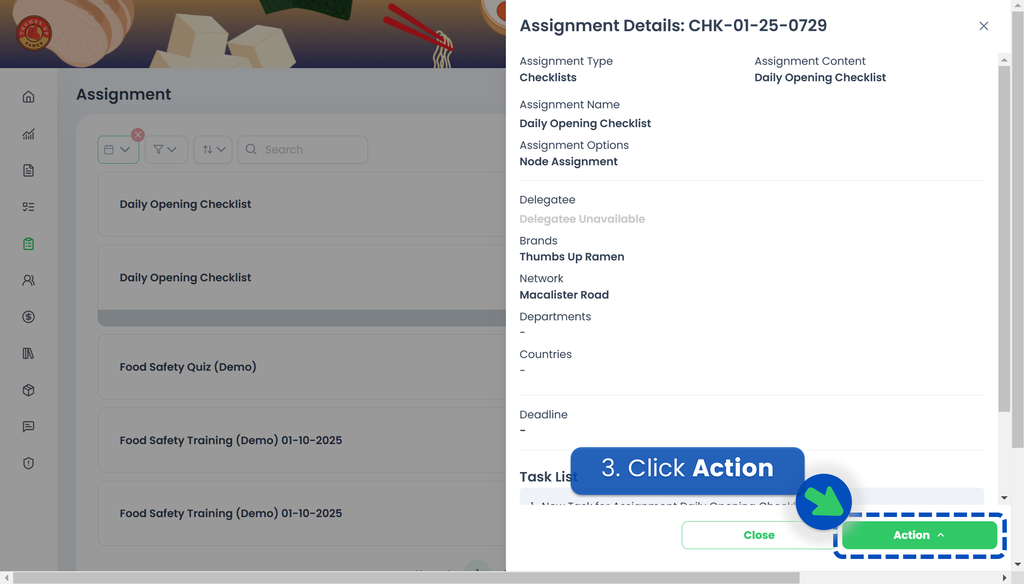
- Select the Checklist assignment you want to cancel.
- A pop up will appear on the right side.
- Click Action. Do note that depending on the checklist type i.e., ad hoc (single checklist) and scheduled, you'll see different options.
- For Ad Hoc Checklist, click Cancel Assignment.
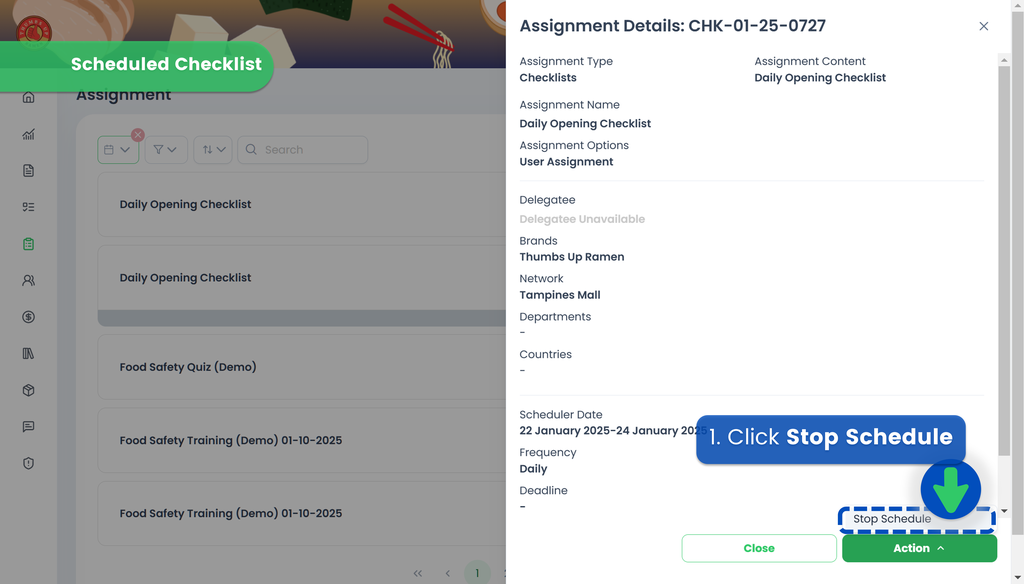
- For Scheduled Checklist:
- Click Stop Schedule.
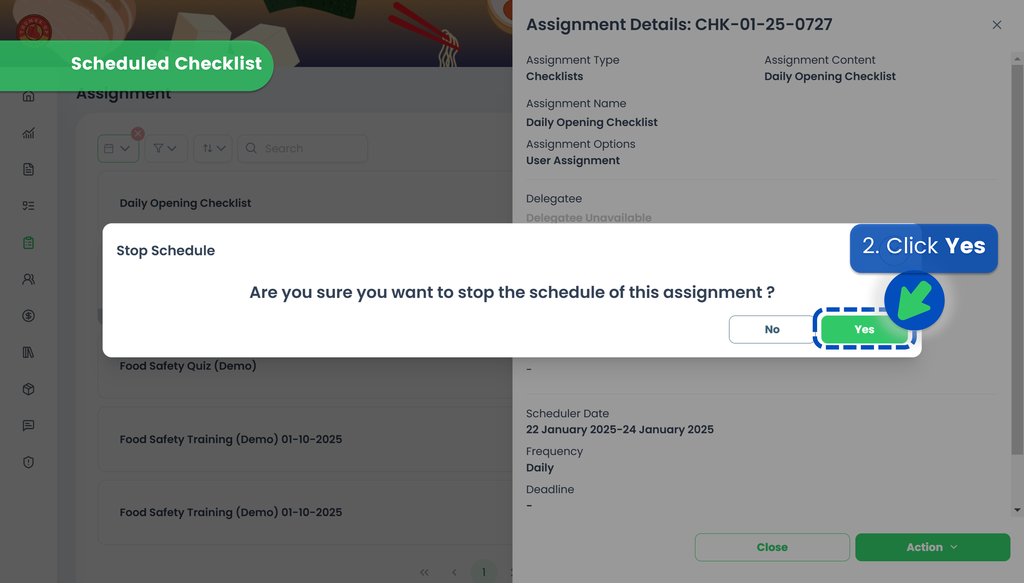
- Click Yes. With this step, the scheduler has been cancelled. To remove the checklist assigment, continue to Step 3!
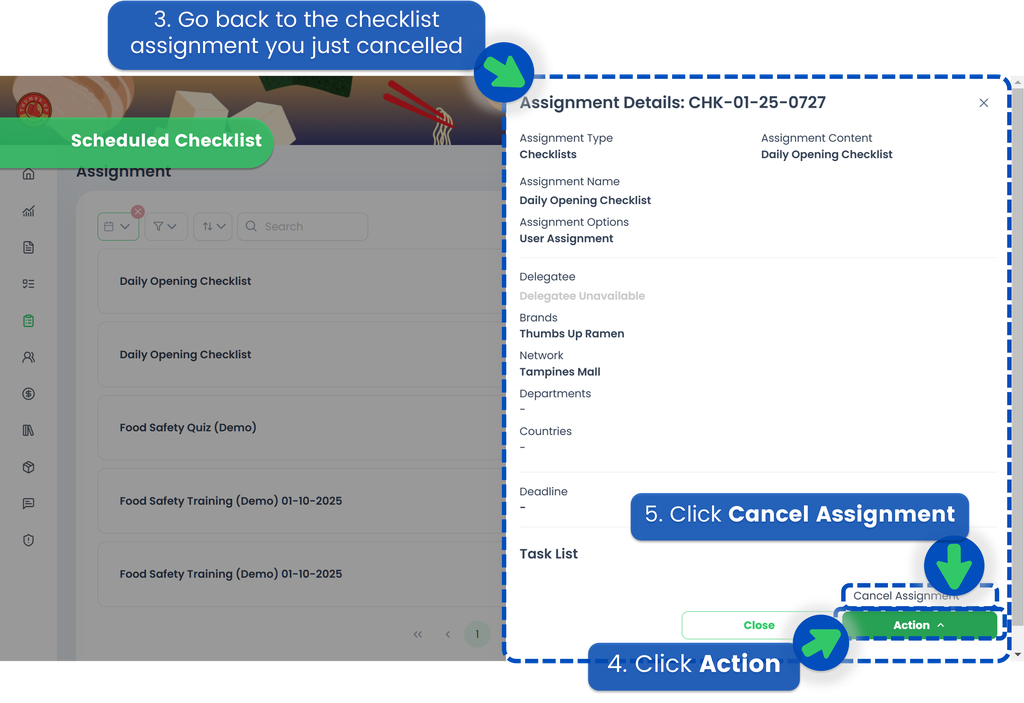
- Go back to the checklist assignment you just cancelled.
- Click Action.
- Click Cancel Assignment. This will remove the assignment, but the checklist content will be retained.