Assigning a Workflow
This section covers:
Creating a Workflow Assignment
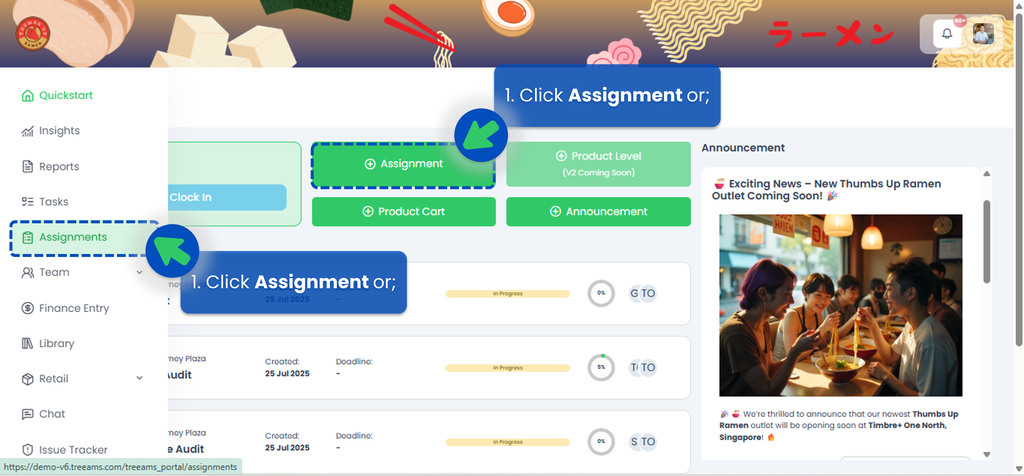
- From the Portal, click Assignments. You can find Assignments from the left panel menu or from the Quickstart page.
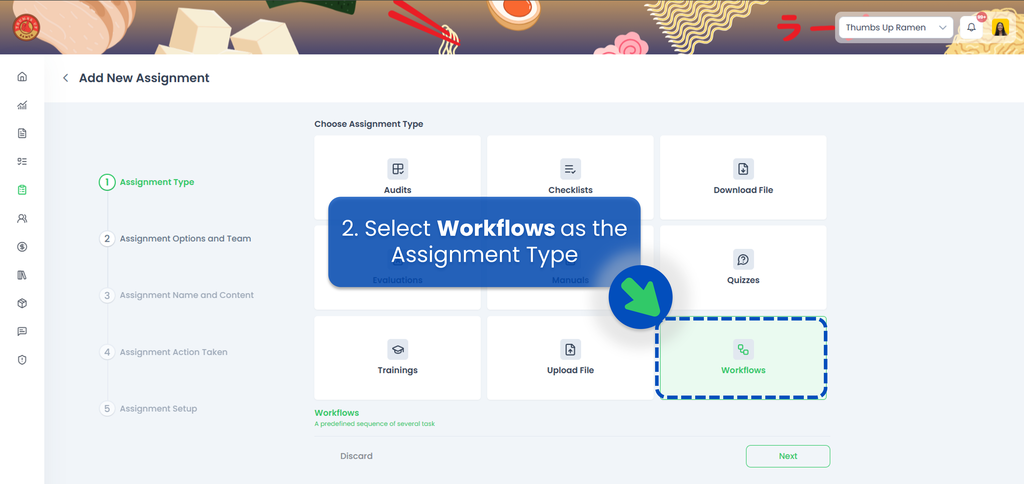
- Select "Workflow" as the Assignment Category, then click Next.
- Select the Assignment Option and the Team(s).
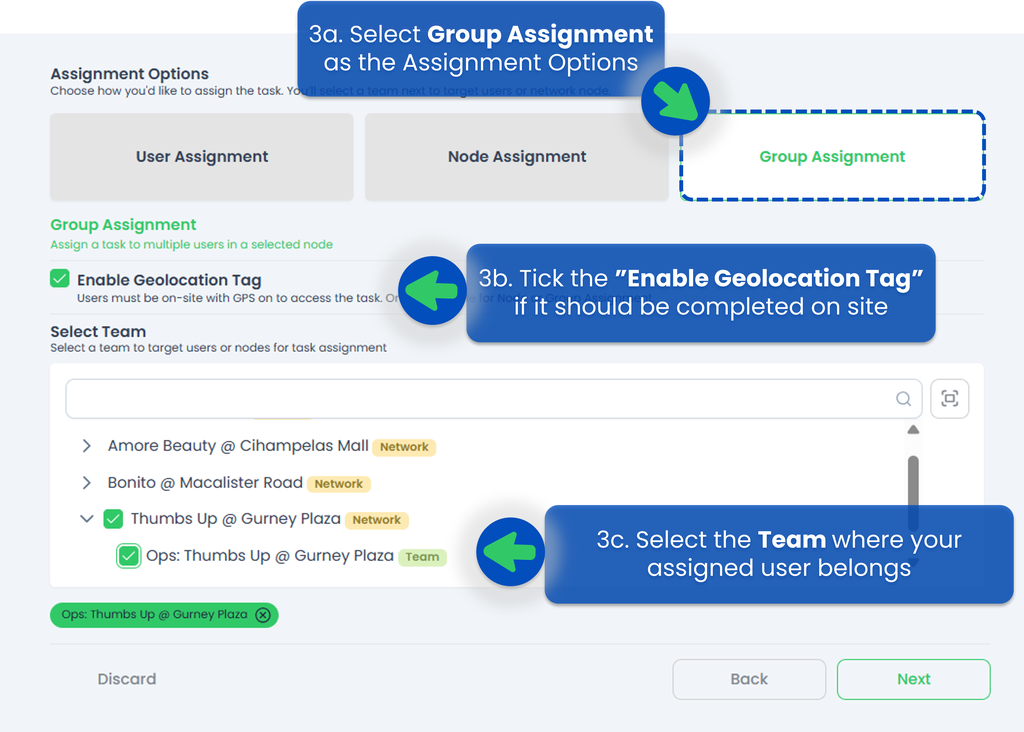
- Since this is a Workflow, you only allow Group Assignments Type which means it can (but doesn’t have to) be completed together with other users.
- You can also tick the "Enable Geolocation Tag" checkbox if the workflow must be done at a specific outlet/location.
- Then pick the team where the users who need to complete the workflow are located.
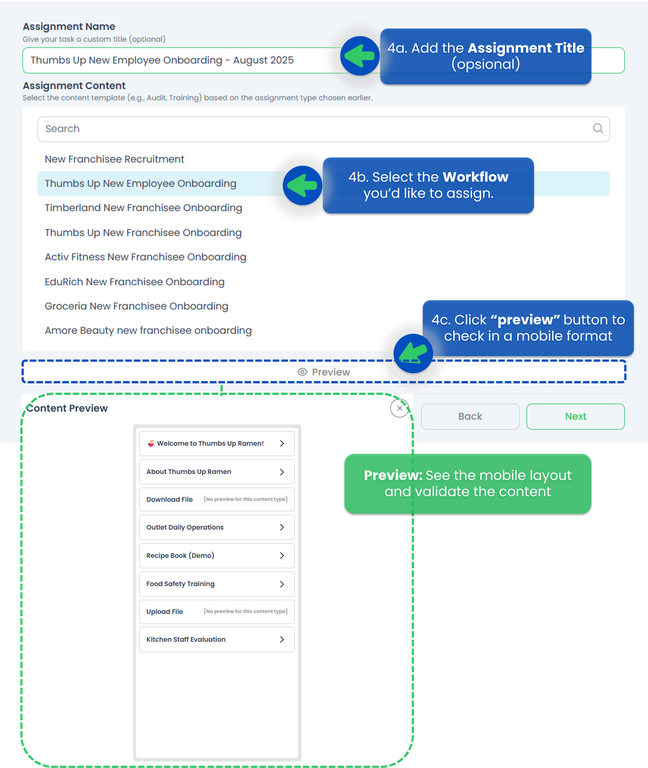
- Set the assignment name and select the content.
- Select the Workflow you'd like to assign. If you haven't created any Workflow, refer to How to create and edit a Workflow to set it up first in the backend.
- This is optional but you can rename your Workflow! If you don’t set one, it will automatically use the content’s name (e.g., if the content is "Thumbs Up New Employee Onboarding", the workflow will have the same title). You can still edit the title here before assigning. The system automatically generates a default title like "New Employee Onboarding", but you can customize it to be more specific—for instance, *"New Employee Onboarding - August 2025"*—to reflect timing or other relevant details. (Note: Once assigned, the title cannot be changed later.)
- You can also click Preview button to see how it looks on a mobile view and confirm the content is correct, then click Next.
- Select an Action for how and when the Workflows will be assigned to the selected team or users, then click Next.
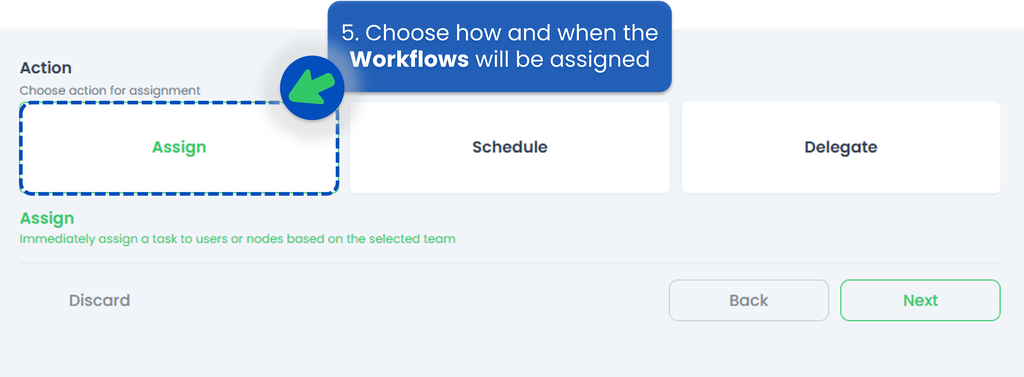 Here is the explaination of each action, you can also refer to Assignment Action Taken for detail.
- Assign Action 👉 You can directly send the Workflow at that time to the person responsible for it. If you're unsure who the appropriate person in charge is but know someone who can identify them, consider using the Delegate feature.
- Delegate Action 👉 instead of directly assigning the Workflows, you have the option to delegate it. This feature is especially helpful when you're unsure who is responsible for completing the Workflows but know someone who can appoint the appropriate person.
- Schedule Action 👉 create a schedule to assign in a regular frequency within a specific timeframe.
- Fill up the Assignment Setup section.
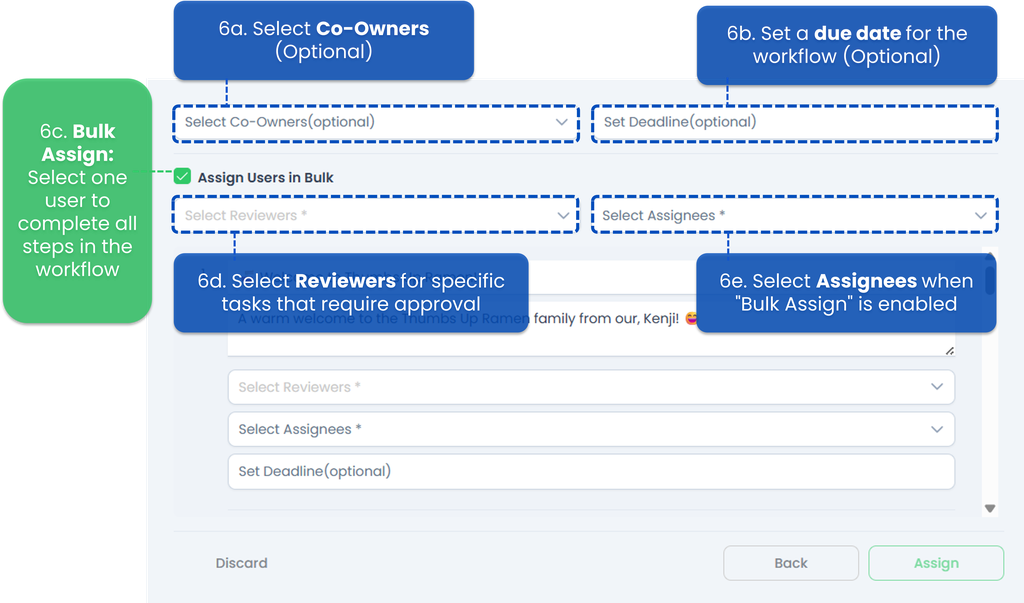
- Select Co-Owners (Optional) 👉 select a secondary user who can collaborate on the workflow (but isn’t the main assignee). Note : The workflow can still be completed without the co-worker’s input.
- Set Deadline (Optional) 👉 set a due date for the workflow. If no deadline is set, the workflow stays active until manually marked as complete. If a deadline is set, assignees will see the due date, and reminders will be sent by e-mail.
- Assign Users in Bulk 👉 means you select one user who must complete all steps in the workflow themselves. If you don't tick "Bulk Assign," you can assign different tasks to different users (e.g., Store Managaer does approval, Staff uploads files) and requires setting assignees per task.
- Select Reviewers 👉 Reviewers are mandatory only if the workflow contains specific tasks that require approval. If no tasks need review, the "Select Reviewers" field will be disabled (unclickable).
- Select Assignees 👉 Choose who must complete the workflow (or specific tasks). When "Bulk Assign" is ticked, the "Select Assignees" field becomes mandatory and the chosen user will handle every task in the workflow. When "Bulk Assign" is unticked, this field is disabled (grayed out) and you’ll assign users within each task.
- File Handling (For Download or Upload Content).
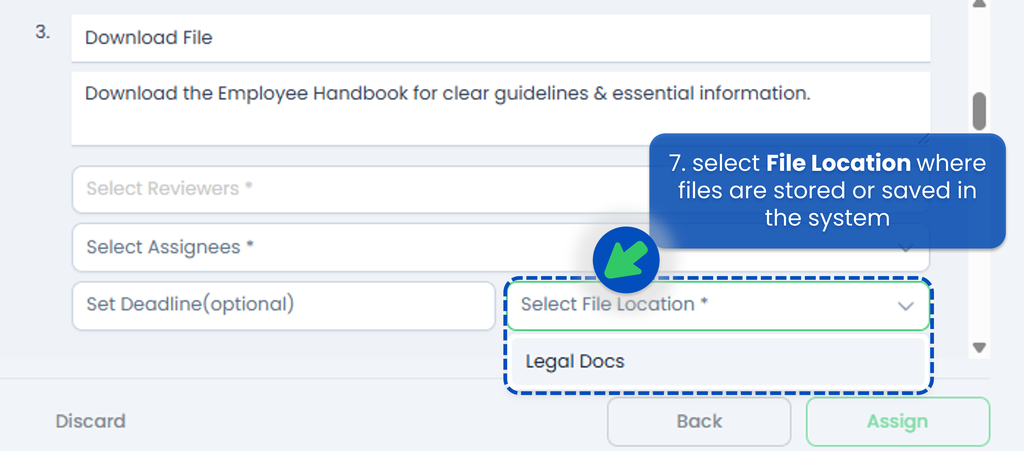 If the workflow involves files, select File Location where files are stored or saved in the system. After clicking on the chosen location, the system will prompt you to select the specific filename to download or upload.
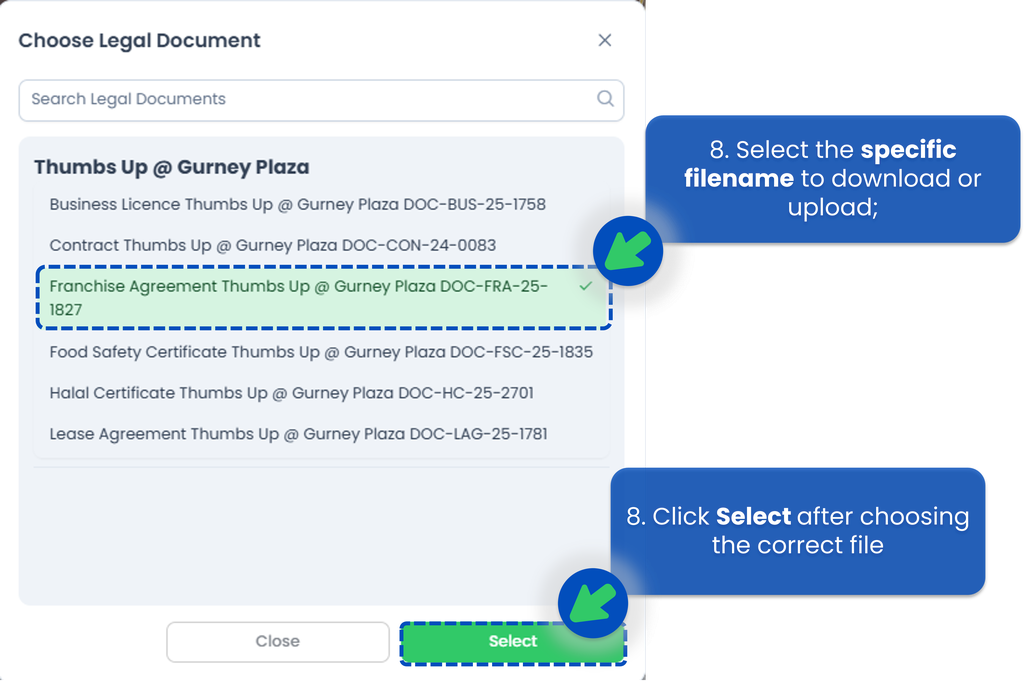
- After all set, click "Assign" to send the workflow to the selected users.
Schedule a Workflow
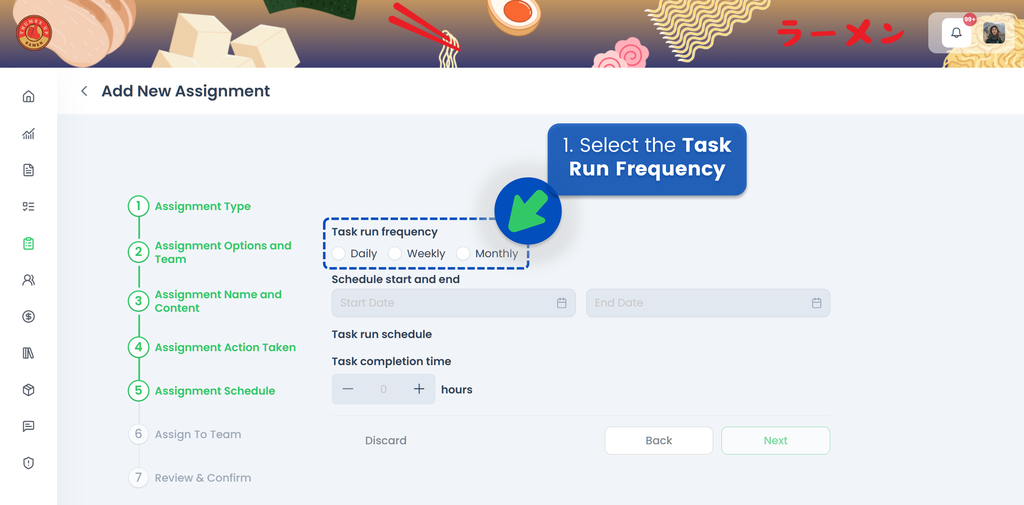
If you choose to Schedule your workflow, the next step is to select the Task Run Frequency, whether it's Daily, Weekly, or Monthly.
Watch the video below to understand how to set the scheduler,
🟢 Daily
- Select Daily for ther Task Run Frequency
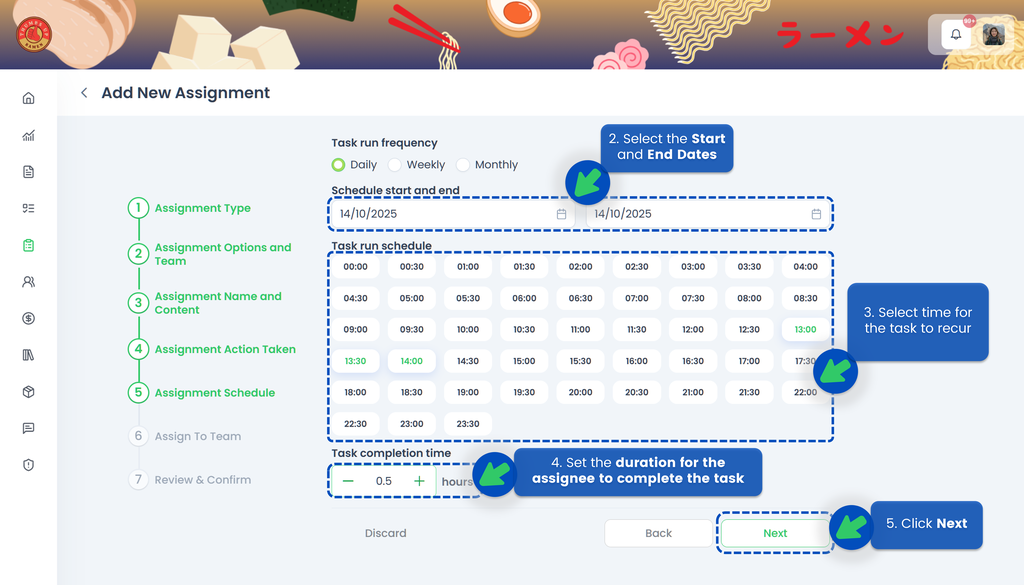
- Select the Start Date and the End Date of the assignment so the system knows when the task should become active and when it should end
- Select time for the task to recur
- Set the duration for the assignee to complete the task. If the assignee misses the deadline, the task will be automatically closed, and the system will indicate that the task was not completed on time
- Click Next
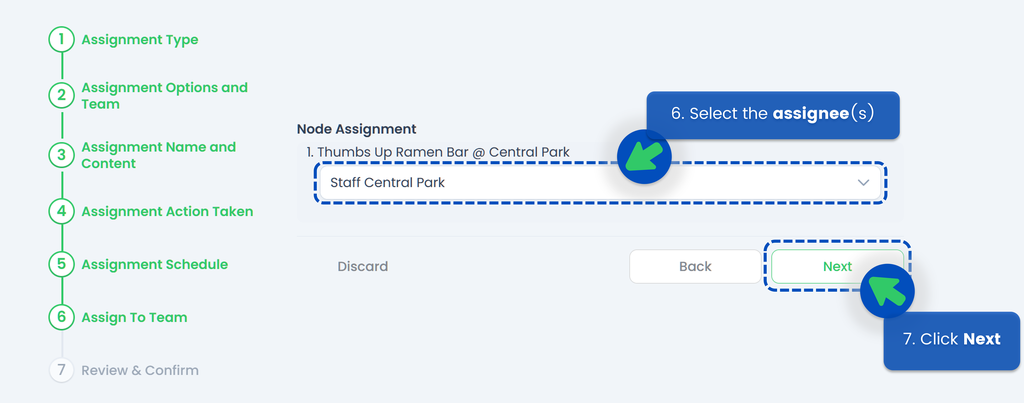
- Select the assignee(s)
- Click Next
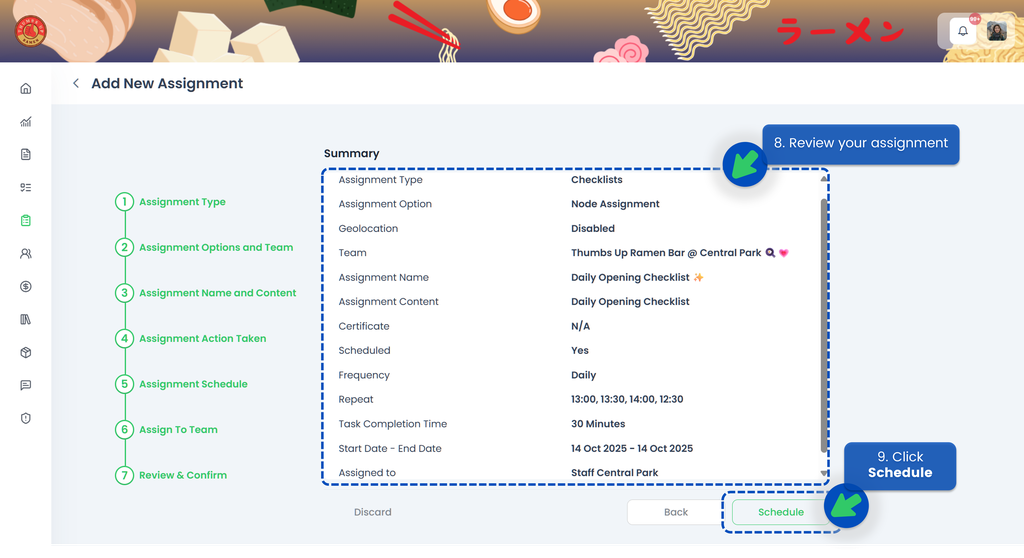
- Review your assignment. Make sure you’ve selected the correct start and end dates, timings, and assignee
- Click Schedule
🟢 Weekly
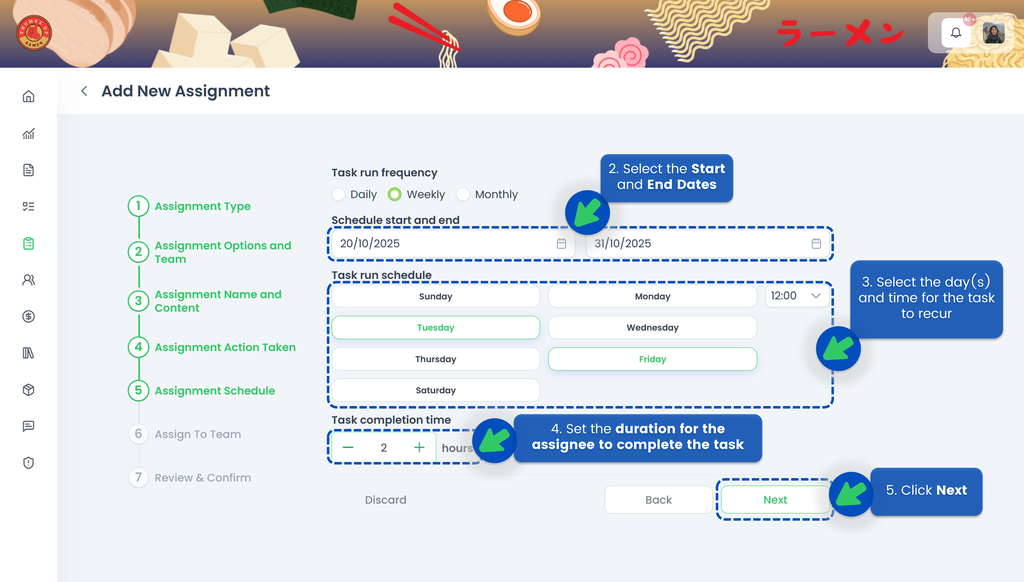
- Select Weekly for ther Task Run Frequency
- Select the Start Date and the End Date of the assignment so the system knows when the task should become active and when it should end
- Select the day(s) and time for the task to recur
- Set the duration for the assignee to complete the task. If the assignee misses the deadline, the task will be automatically closed, and the system will indicate that the task was not completed on time
- Click Next
- Select the assignee(s)
- Click Next
- Review your assignment. Make sure you’ve selected the correct start and end dates, timings, and assignee
- Click Schedule



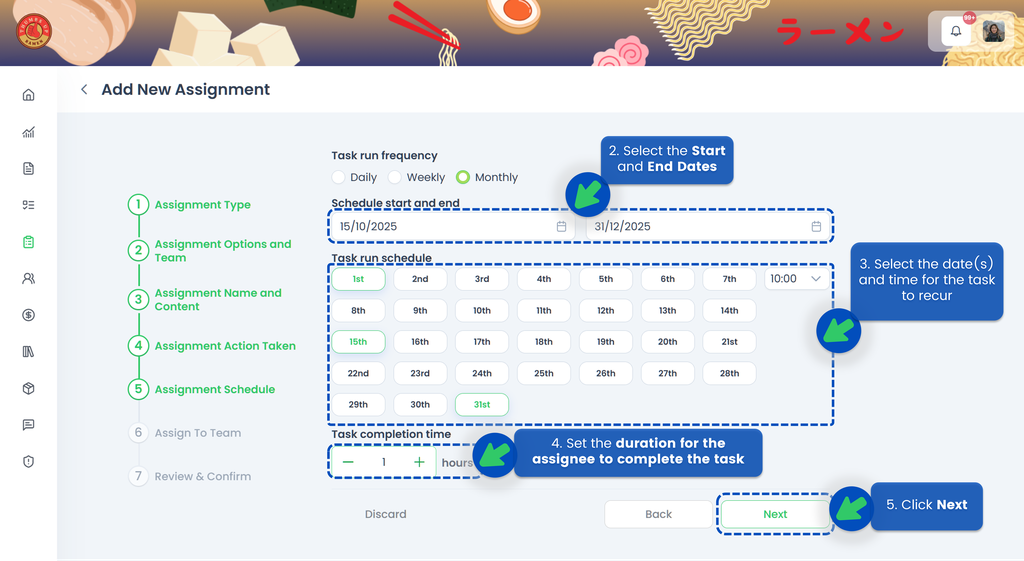
🟢 Monthly
- Select Monthly for ther Task Run Frequency
- Select the Start Date and the End Date of the assignment so the system knows when the task should become active and when it should end
- Select the date(s) and time for the task to recur
- Set the duration for the assignee to complete the task. If the assignee misses the deadline, the task will be automatically closed, and the system will indicate that the task was not completed on time
- Click Next
- Select the assignee(s)
- Click Next
- Review your assignment. Make sure you’ve selected the correct start and end dates, timings, and assignee
- Click Schedule

💡 If a month does not have 31 days, the task will be created on the last day of that month. For example, if a task is scheduled to recur on the 31st of each month, the task for February will be created on the 28th.
