Document Setup
On TreeAMS, you can store multiple documents into each organisation and get reminders when you need to get notified on expiring documents! Documents that can be stored are but not limited to: franchise agreements, contracts, licenses, and certificates. In fact, it doesn't have to be a document. You can also use this feature as a reminder. Follow below steps to start adding documents and reminders for your TreeAMS account!
This section covers:
Adding Documents to Organisation
- Go to Desk. Learn how you can switch to Desk here!
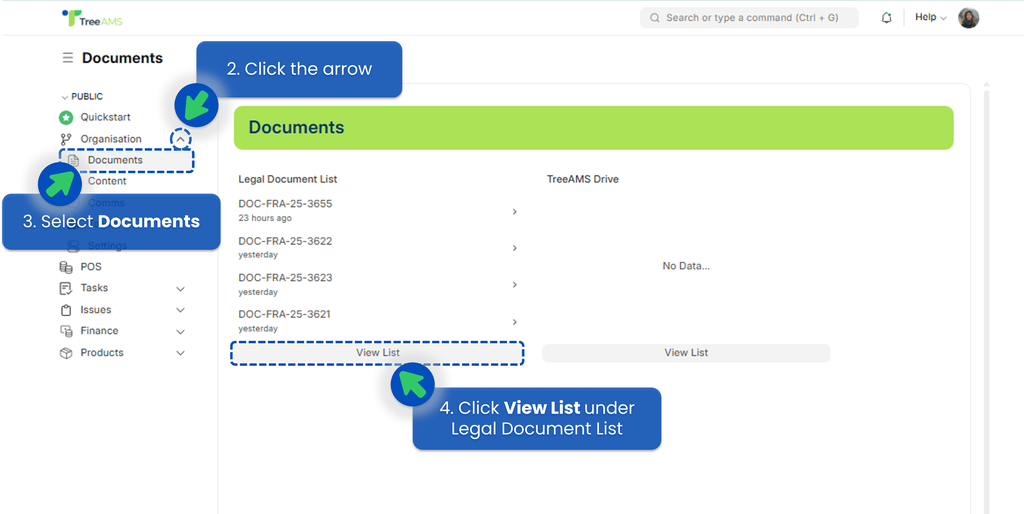
- Click the dropdown next to Home menu.
- Select Documents.
- Click View List under the Legal Document List section.
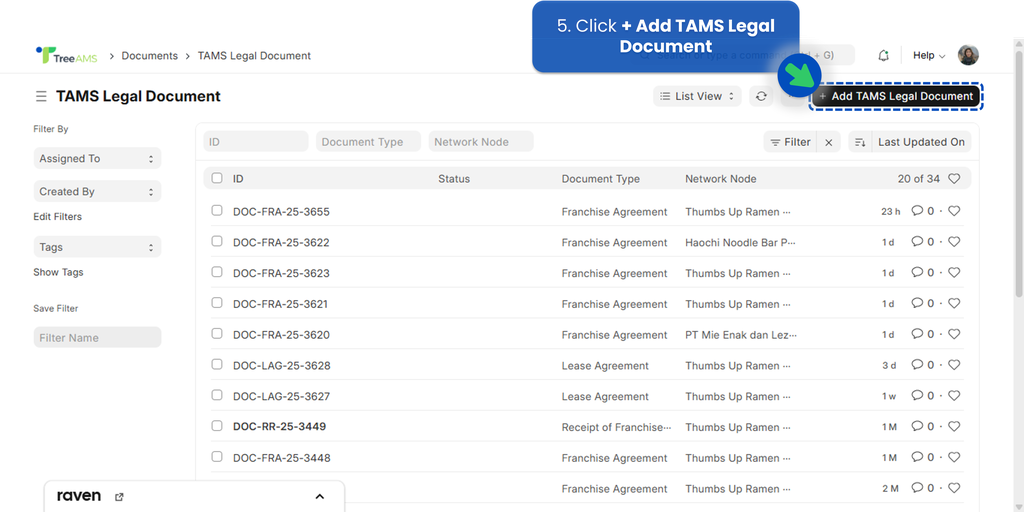
- Click + Add TAMS Legal Document to upload a new document or click on any row to open the document details.
- Complete the document's information!
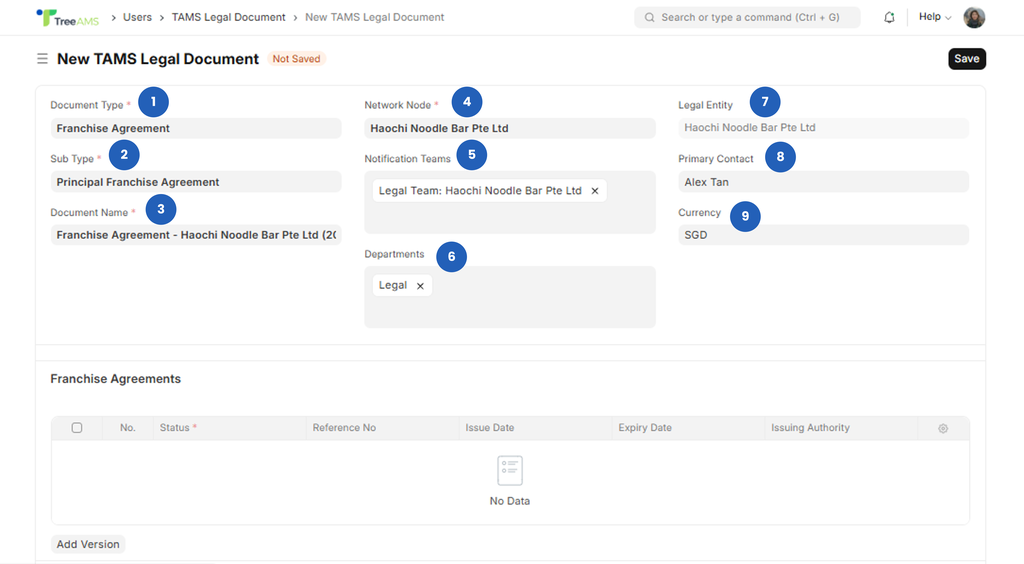
- Document Type 👉 Select the main category of the legal document (e.g., Franchise Agreement, Lease Agreement, Business Licence).
- Sub Type 👉 Choose the specific classification within the document type (e.g., Renewal, Addendum, Termination). Helps organise and filter documents more accurately.
- Document Name 👉 Enter the full name or title of the document. Example: Thumbs Up – Franchise Agreement 2025.
- Network Node 👉 Select the Branch or Unit that this document belongs to. This determines where the document appears in your Organisation Structure.
- Notification Teams 👉 Choose which teams should receive reminders or notifications related to this document (e.g., Document Review, Legal, Operations Team).
- Departments 👉 Select relevant internal departments that should be linked to or informed about this document (e.g., Finance, Legal, Operations). Legal Entity 👉 Auto-filled based on your Organisation settings. This ensures the document is tied to the correct legal owner.
- Primary Contact 👉 The main contact person associated with this document. Used for communication, order-related matters, and coordination with suppliers or partners.
- Currency 👉 The currency used for this document (e.g., SGD, MYR, IDR). Auto-filled based on your Organisation settings.
- After filling in all required fields, click Save.
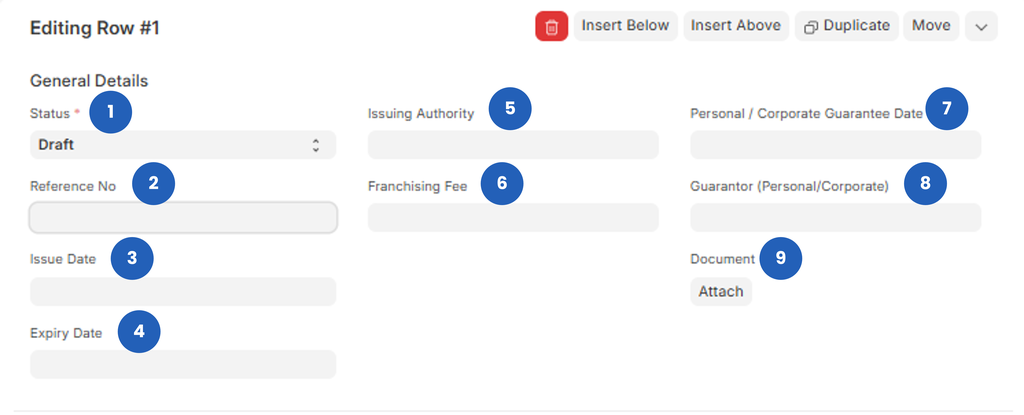
Under Franchise Agreements section, click Add Version. The name of this section adapts based on the Document Type you selected—for example, “Franchise Agreement”.

- General Details
- Status 👉 The current status of this document version (e.g., Draft, Active, Expired).
- Draft: The document is still being prepared and not yet finalised.
- Active: The document is current, approved, and in use.
- Expired: The document is no longer valid and may need to be updated or replaced.
- Reference No 👉 The official reference number of the document (if available). Example: FA-2025-THUMBSUP-01
- Issue Date 👉 The official date the document was issued or signed.
- Expiry Date 👉 The end date of the agreement or document validity. This field triggers reminders if Document Reminder is enabled.
- Issuing Authority 👉 The organization or authority that issued or approved this document.
- Franchising Fee 👉 Enter the fee amount stated in the agreement (if applicable).
- Personal / Corporate Guarantee Date 👉 The date the personal or corporate guarantee was signed (if required for franchise agreements).
- Guarantor (Personal/Corporate) 👉 Name of the guarantor responsible for the agreement, either an individual or a corporation.
- Document 👉 Click Attach to upload the actual document file (PDF, image, or scanned copy).
- Issuing Authority: The person, team, or department responsible for creating and approving the document.
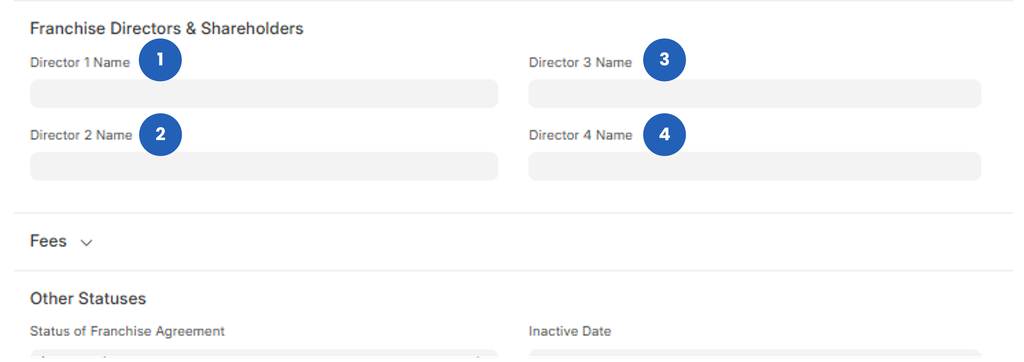
- Franchise Directors & Shareholders
- Director 1 Name 👉 Enter the full name of the first director.
- Director 2 Name 👉 Enter the second director’s name (optional if not applicable).
- Director 3 Name 👉 Enter the third director’s name (if applicable).
- Director 4 Name 👉 Enter the fourth director’s name (if applicable).
- Fees
- Inventory Deposit 👉 The deposit paid for initial stock or inventory setup.
- Security Deposit 👉 The required security deposit for the agreement.
- Top Up 👉 Additional deposit or top-up amount required for operational needs.
- Training Fee 👉 The fee charged for training sessions provided to the franchisee or operational team.
- Relocation Fee 👉 The fee charged when relocating a unit/outlet to a new site.
- Technical Support Fee 👉 The fee for ongoing technical support as per the contract.
- Royalty 👉 The royalty amount payable by the franchisee as stated in the agreement.
- Advertising and Promotion Fee 👉 The fee allocated for brand marketing and promotional activities.
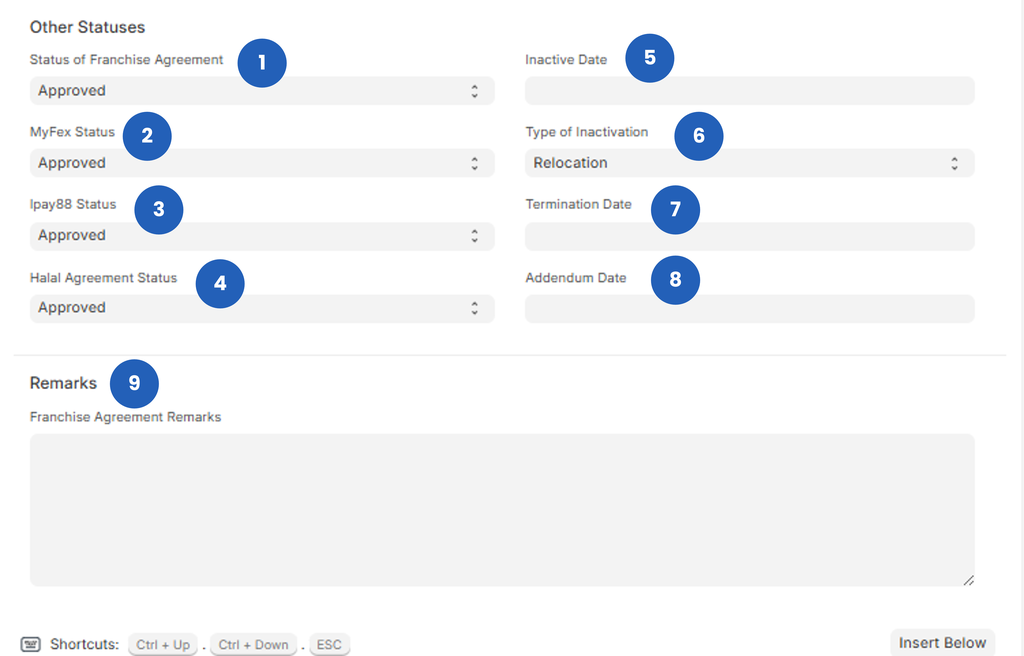
- Other Statuses.
This section is used to capture additional statuses related to the legal document or operational requirements. - Status of Franchise Agreement 👉 Indicates the approval or current status of the franchise agreement (e.g., Approved, Pending)
- MyFex Status 👉 The status for MyFex (if your brand uses it for franchise registration or reporting)
- Ipay88 Status 👉 The onboarding or verification status for iPay88 payment services
- Halal Agreement Status 👉 The approval status of the halal certification or halal agreement (if applicable)
- Inactive Date 👉 The date the document or agreement becomes inactive
- Type of Inactivation 👉 The reason for inactivation, such as Relocation, Closed, or Terminated
- Termination Date 👉 The official date the agreement was terminated
- Addendum Date 👉 The date an addendum or amendment to the main document was issued
- Remarks 👉 Additional notes or important information related to the agreement. Use this section to store internal comments, context, or any relevant remarks.

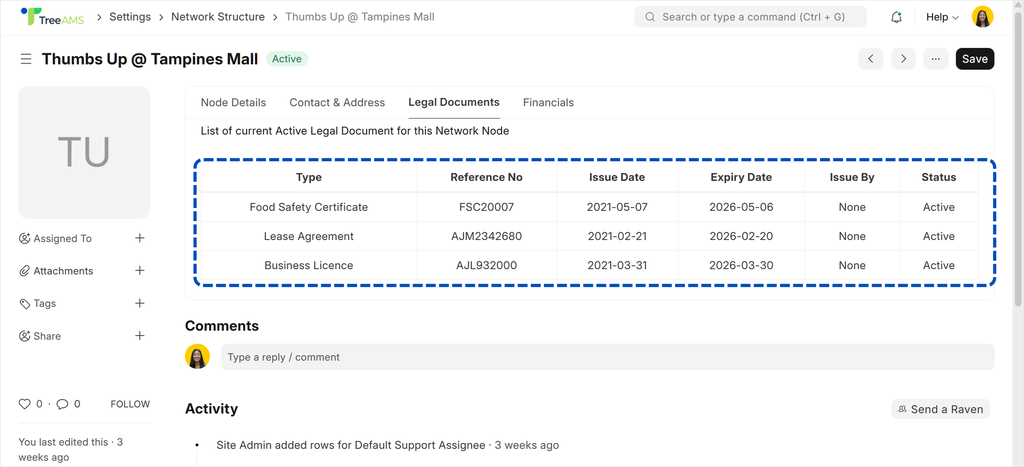
To see it from your organisation structure:
- Go to Organisation → Organisation Tree View
- Hover over the relevant branch or unit
- Click Edit
- Open the Legal Documents tab
- Your document will appear as shown below 👇
Document Types vs Document Sub Types
In TreeAMS, legal documents are organised using two levels of classification: Document Types and Document Sub Types. Both serve different purposes and have different permission rules.
Document Types
👉 The main category of a legal document.
Examples:
- Franchise Agreement
- Lease Agreement
- Halal Certificate
- Business Licence
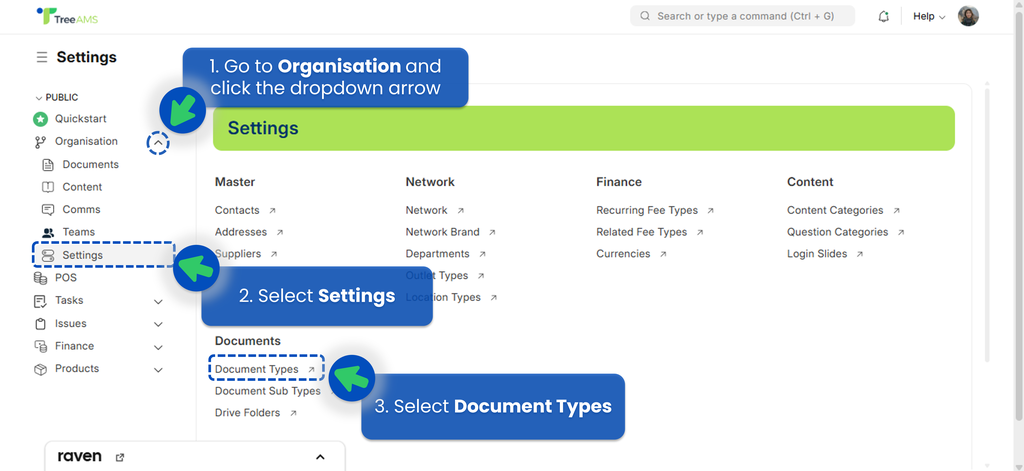
Document Types help group documents based on their overall purpose, making it easier to filter and manage records across the organisation. Here is how to access Document Types:
- On the Desk site then click the dropdown next to Organisation
- Select Settings
- Select Document Types
Permissions (Important):
- Users cannot create new Document Types unless they have administrator permissions.
- This restriction ensures consistency and standardisation across the organisation.
- If you believe a new Document Type should be added and is commonly used, please inform your TreeAMS Administrator.
Document Sub Type
👉 The specific variant or classification within a document type.
Examples:
- Renewal
- Addendum
- Termination
- Amendment
- Extension
Sub Types allow you to add more detail and nuance to the document, helping track different versions or scenarios of the same main document category. Here is how to access Document Sub Types:
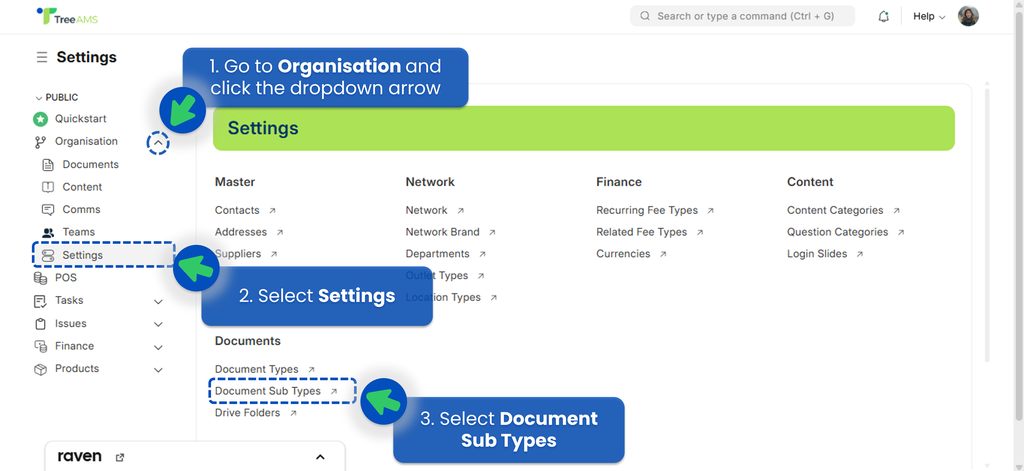
- On the Desk site then click the dropdown next to Organisation
- Select Settings
- Select Document Sub Types
Permissions: 🛈
- Users are allowed to add new Document Sub Types freely.
- You can create as many sub types as needed to match your organisation’s processes.
On this page