Organisation Structure
This section covers:
- Understanding Branches and Units
- Managing Branches
- Managing Units
Understanding Branches and Units
Difference Between Branch and Unit
In TreeAMS, there are two key Organisation terms you should understand before setting up your brand structure:
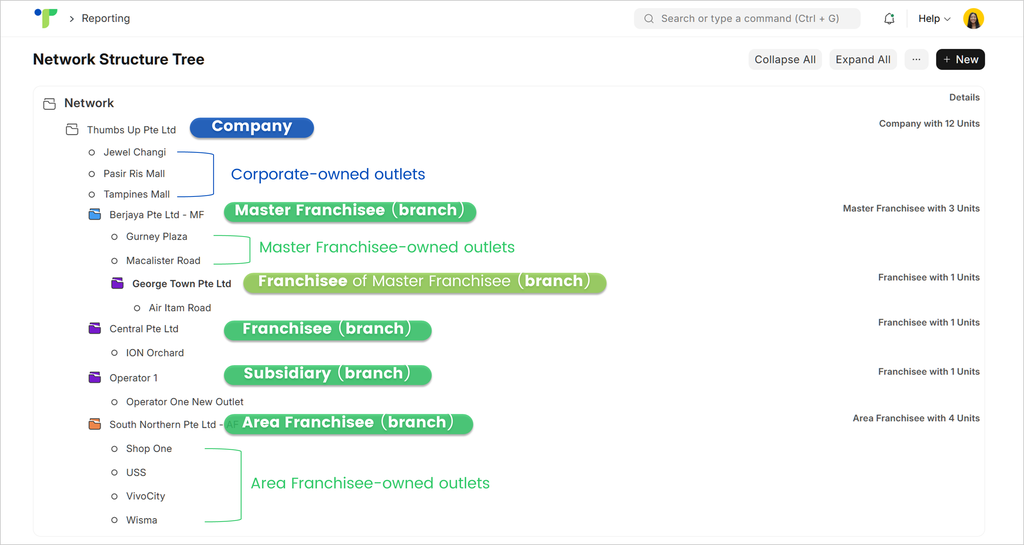
- Branch 👉 Refers to any entity associated with your main company. This includes subsidiaries, single-unit franchisees, area franchisees, or master franchisees.
Please note that not all branches are subsidiaries — some may operate under different ownership or franchise arrangements. - Unit 👉 Refers to individual locations such as outlets, stores, studios, or centers.
- If a unit is directly under your main company (not linked to any other entity), it is considered corporate-owned.
- If a unit is under another entity, it is managed by that entity or operates as a franchised unit.
IMPORTANT‼️ Branch and Unit names must not be identical. Using the same name for both can cause confusion when assigning users or tasks within the Organisation.
For example, if both your Branch and Unit are named “Thumbs Up South”, it may later become unclear which one refers to the Branch and which refers to the Unit when performing assignments or configurations in the system.
Branch Types

Unit Types
A Unit Type represents the classification of your business locations based on their specific operations.
Examples of Unit Types include categories such as Flagship, Dine-In Outlet, or Delivery-Only.
Defining Unit Types allows you to manage operations and permissions more effectively, tailoring them to the unique needs of each type of Unit within your Organisation.
If none of the default Unit Types fit your business, you can easily create new ones and remove those you don’t need. Follow the steps below to create or manage Unit Types:
- Go to the Desk. Learn how to switch to Desk here.
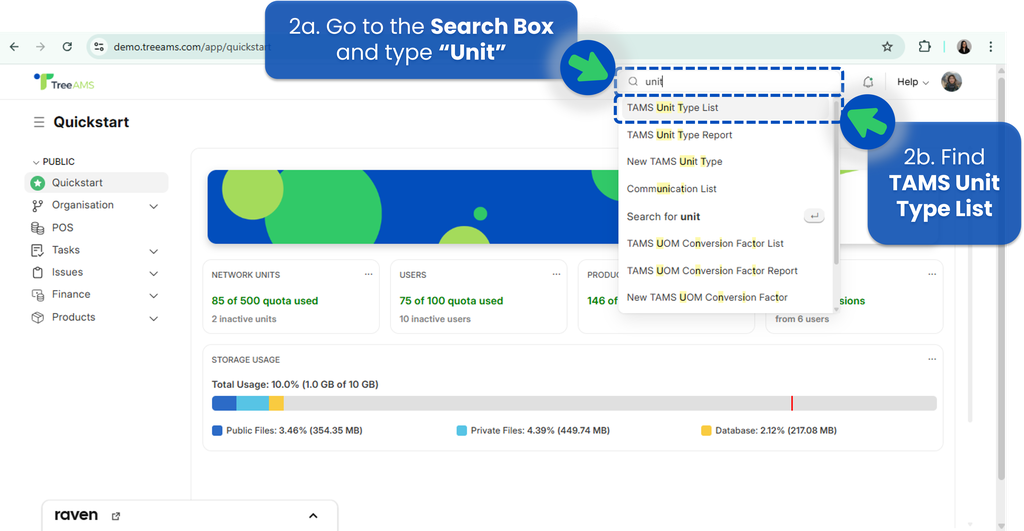
- In the Search Box, type “Unit” and select “TAMS Unit Type List.”
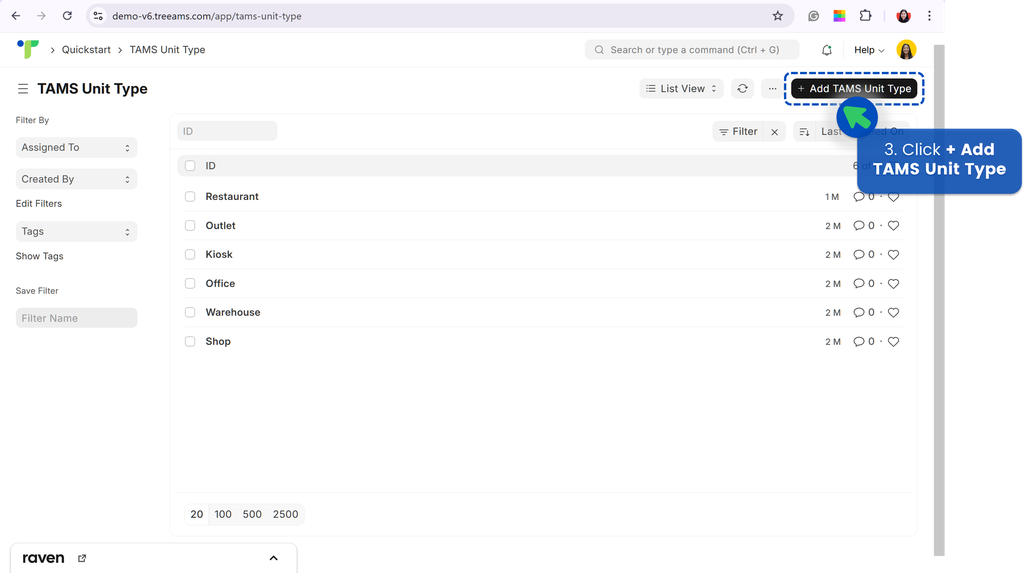
- Click + Add TAMS Unit Type.
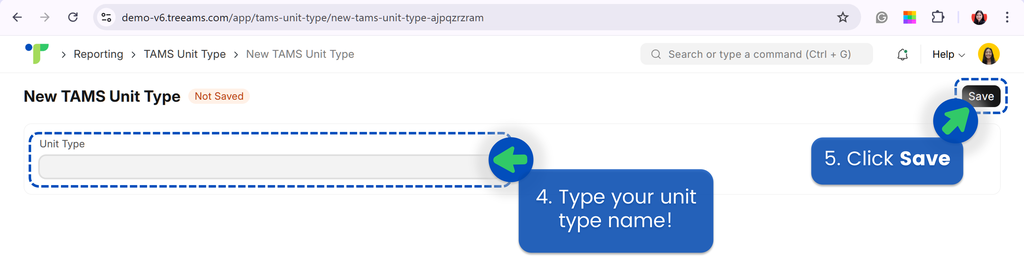
- Enter your desired Unit Type name.
- Click Save to create the new Unit Type.
Managing Branches
Adding a New Branch
- Go to the Desk. Learn how to switch to Desk here.
- Click Organisation.
- Go to Network Structure.
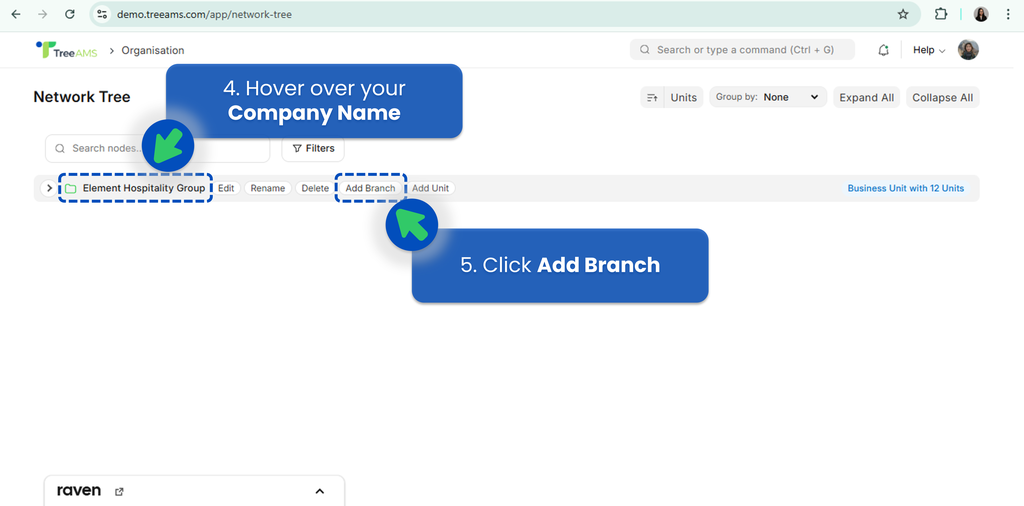
- Hover over your Company or Branch Name to display the right-side menu.
Please note that certain branch type options may not be available, depending on your parent branch type. - Click Add Branch.
- Fill in the following details:
- New Node Name 👉 The name that will appear in the Organisation Structure. This can be the same as your legal entity name.
Example: GoodFood Pte Ltd - Node Type 👉 The type of branch you are creating. This could be a Franchisee or a Subsidiary.
Refer to Branch Types to learn more about the available branch types in TreeAMS. - Legal Entity Name 👉 The officially registered name of your company.
Example: GoodFood Pte Ltd - Click Add New Branch


Deactivating a Branch
- Go to the Desk. Learn how to switch to Desk here.
- Click Organisation.
- Go to the Organisation Tree.
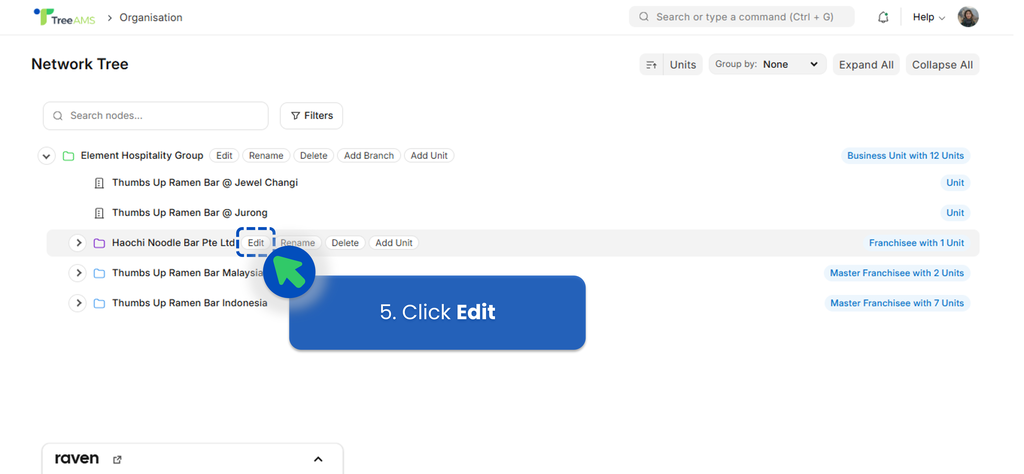
- Hover over your Company or Branch Name to open the right-hand menu.
- Click Edit.
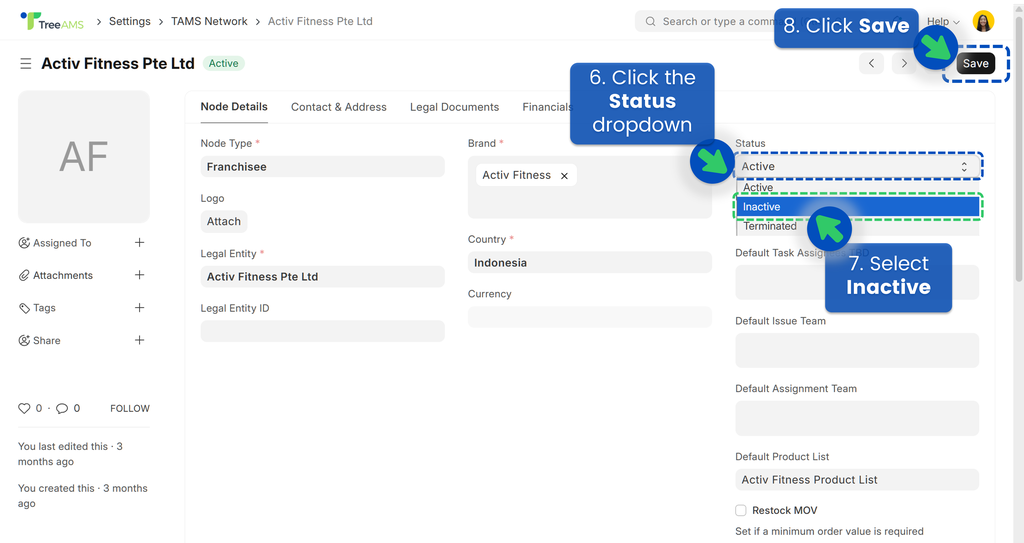
- Open the Status dropdown menu.
- Select Inactive.
- Click Save to confirm the update.

✅ Tip: Deactivating a branch temporarily removes it from active use without deleting it, allowing you to reactivate it later if needed.
Removing a Branch
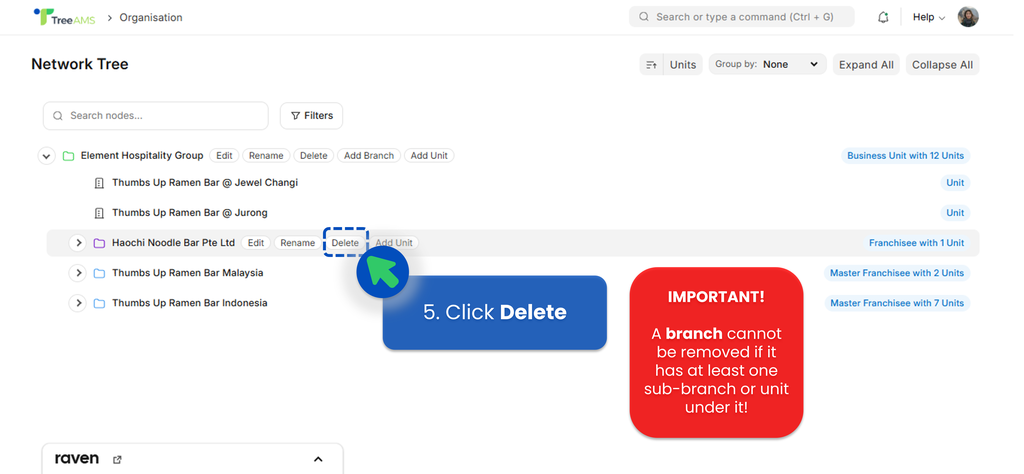
Note: A branch cannot be removed if it has one or more sub-branches or units under it. Additionally, if there are any assigned tasks, teams, or other associated data linked to the branch, deletion will not be possible. As an alternative, you may choose to deactivate the branch instead.
- Go to the Desk. Learn how to switch to Desk here.
- Click Organisation.
- Go to the Organisation Tree.
- Hover over the Branch Name you want to remove to open the right-hand menu.
- Click Delete.
✅ Tip: Always review your Organisation Tree before deleting a branch to ensure there are no dependencies or linked records.
Managing Units
Adding a New Unit
- Go to the Desk. Learn how to switch to Desk here.
- Click Organisation.
- Go to the Organisation Tree.
- Hover over your Company or Branch Name to open the right-hand menu.
- Click Add Unit.
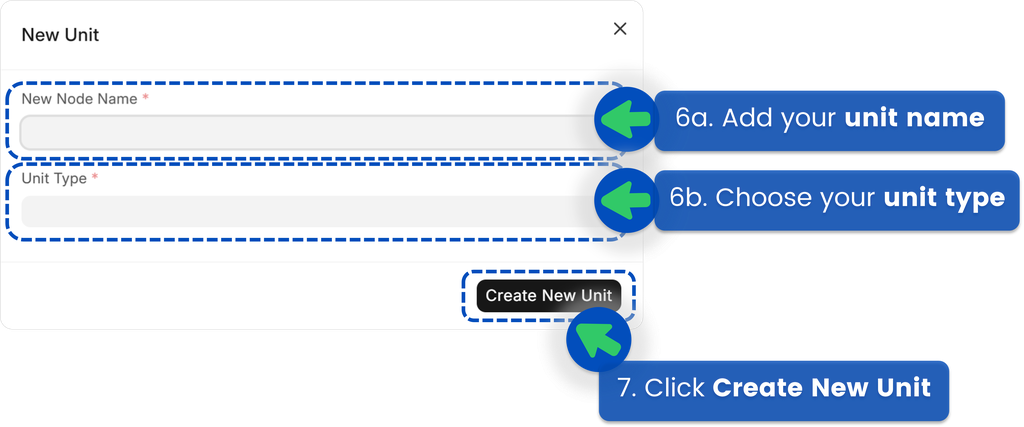
- Fill in the required details:
- New Node Name 👉 The name that will appear in your Organisation Structure.
Example: Thumbs Up @ ION Orchard - Unit Type 👉 Refers to the concept or category of the unit.
Examples: Flagship, Kiosk, Store, Restaurant, Takeaway, Gym, Office, etc.
If you don’t see a Unit Type that fits your business, you can create a new one by clicking + Create a new TAMS Unit Type.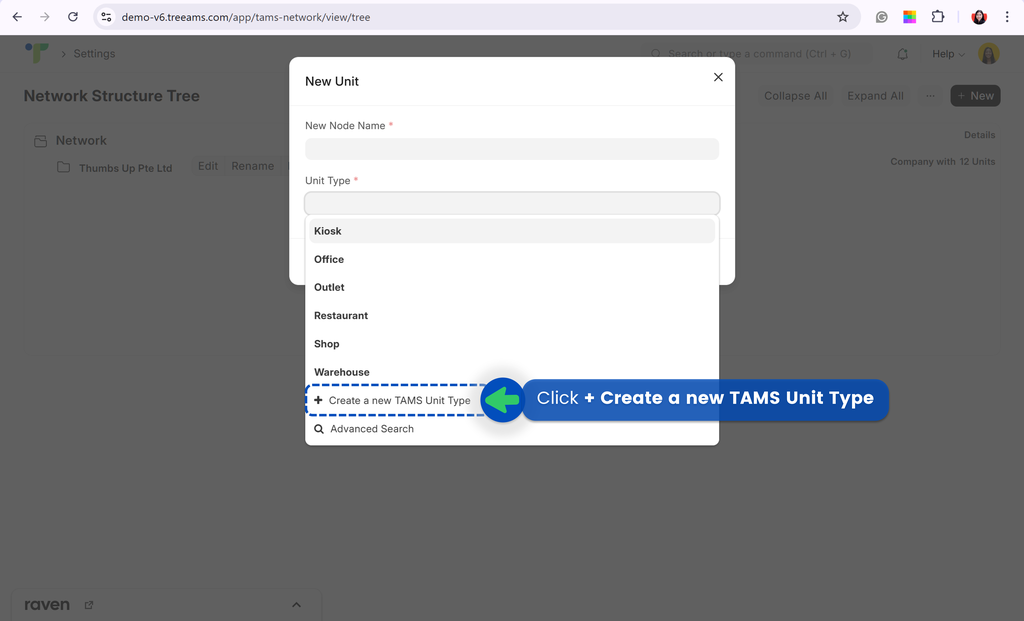
Refer to Unit Types for more details. - Click Create New Unit to save.
Deactivating a Unit
- Go to the Desk. Learn how to switch to Desk here.
- Click Organisation.
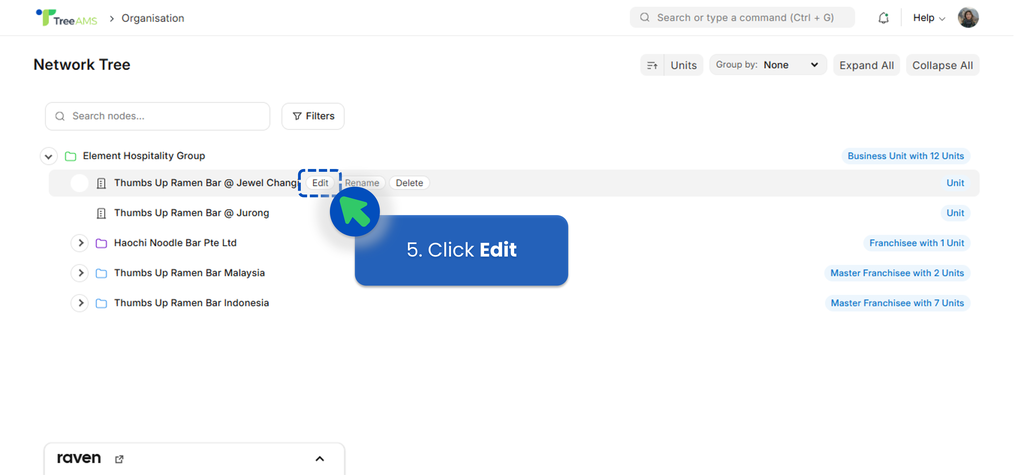
- Go to the Organisation Tree.
- Hover over your Unit Name to open the right-hand menu.
- Click Edit.
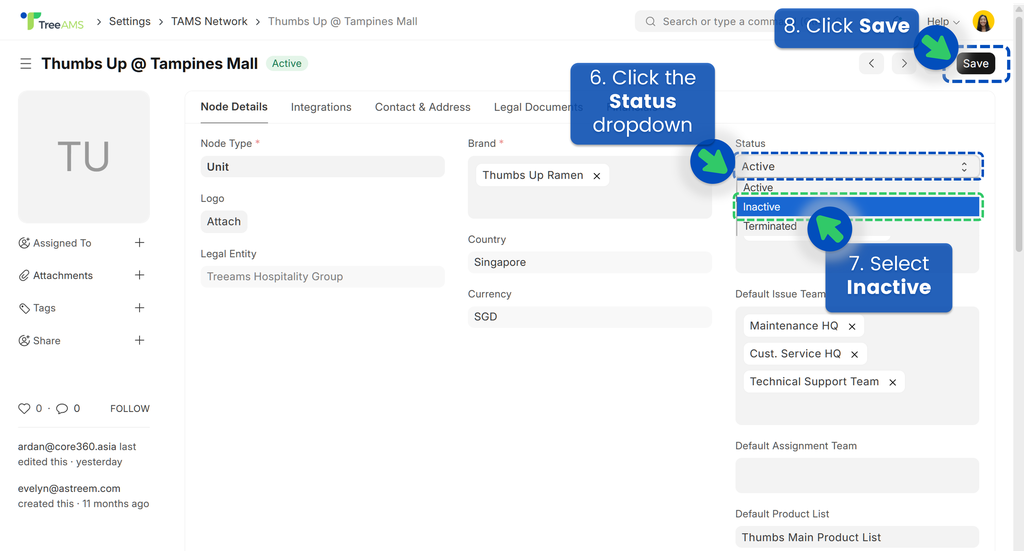
- Open the Status dropdown menu.
- Select Inactive.
- Click Save to confirm your changes.
When a unit is deactivated, its quota will automatically be returned to your account.
✅ Tip: Use the Inactive status for units that are temporarily closed or undergoing transition — this keeps your Organisation Structure accurate without losing historical data.
Removing a Unit
Note: A unit cannot be removed if it has any assigned tasks, teams, or other associated data. As an alternative, you may choose to deactivate the unit instead.
- Go to the Desk. Learn how to switch to Desk here.
- Click Organisation.
- Go to the Organisation Tree.
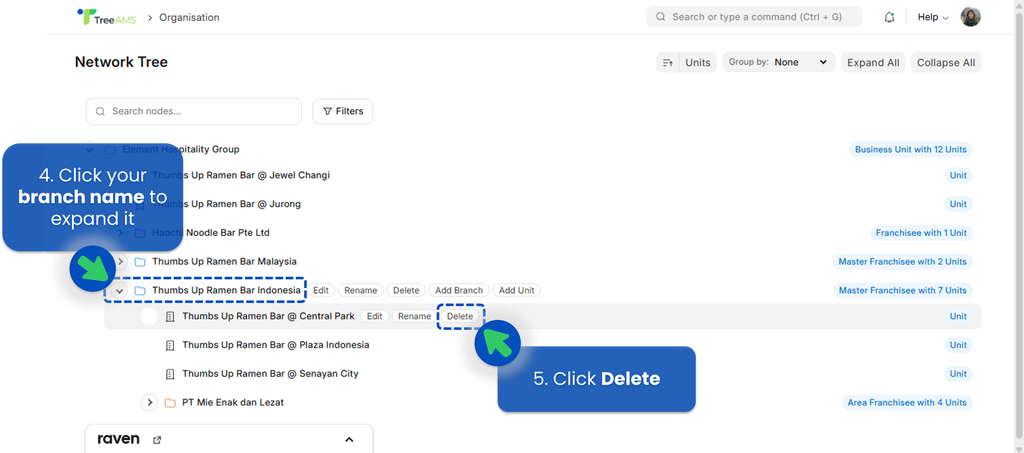
- Hover over the Unit Name to open the right-hand menu.
If you don’t see the unit, expand the corresponding branch first by clicking the branch name. - Click Delete.
✅ Tip: Always verify that the unit has no active data or linked records before deleting it. If the unit is still in use or may be reactivated later, consider marking it as Inactive instead.